Lemon Blackberry Scones

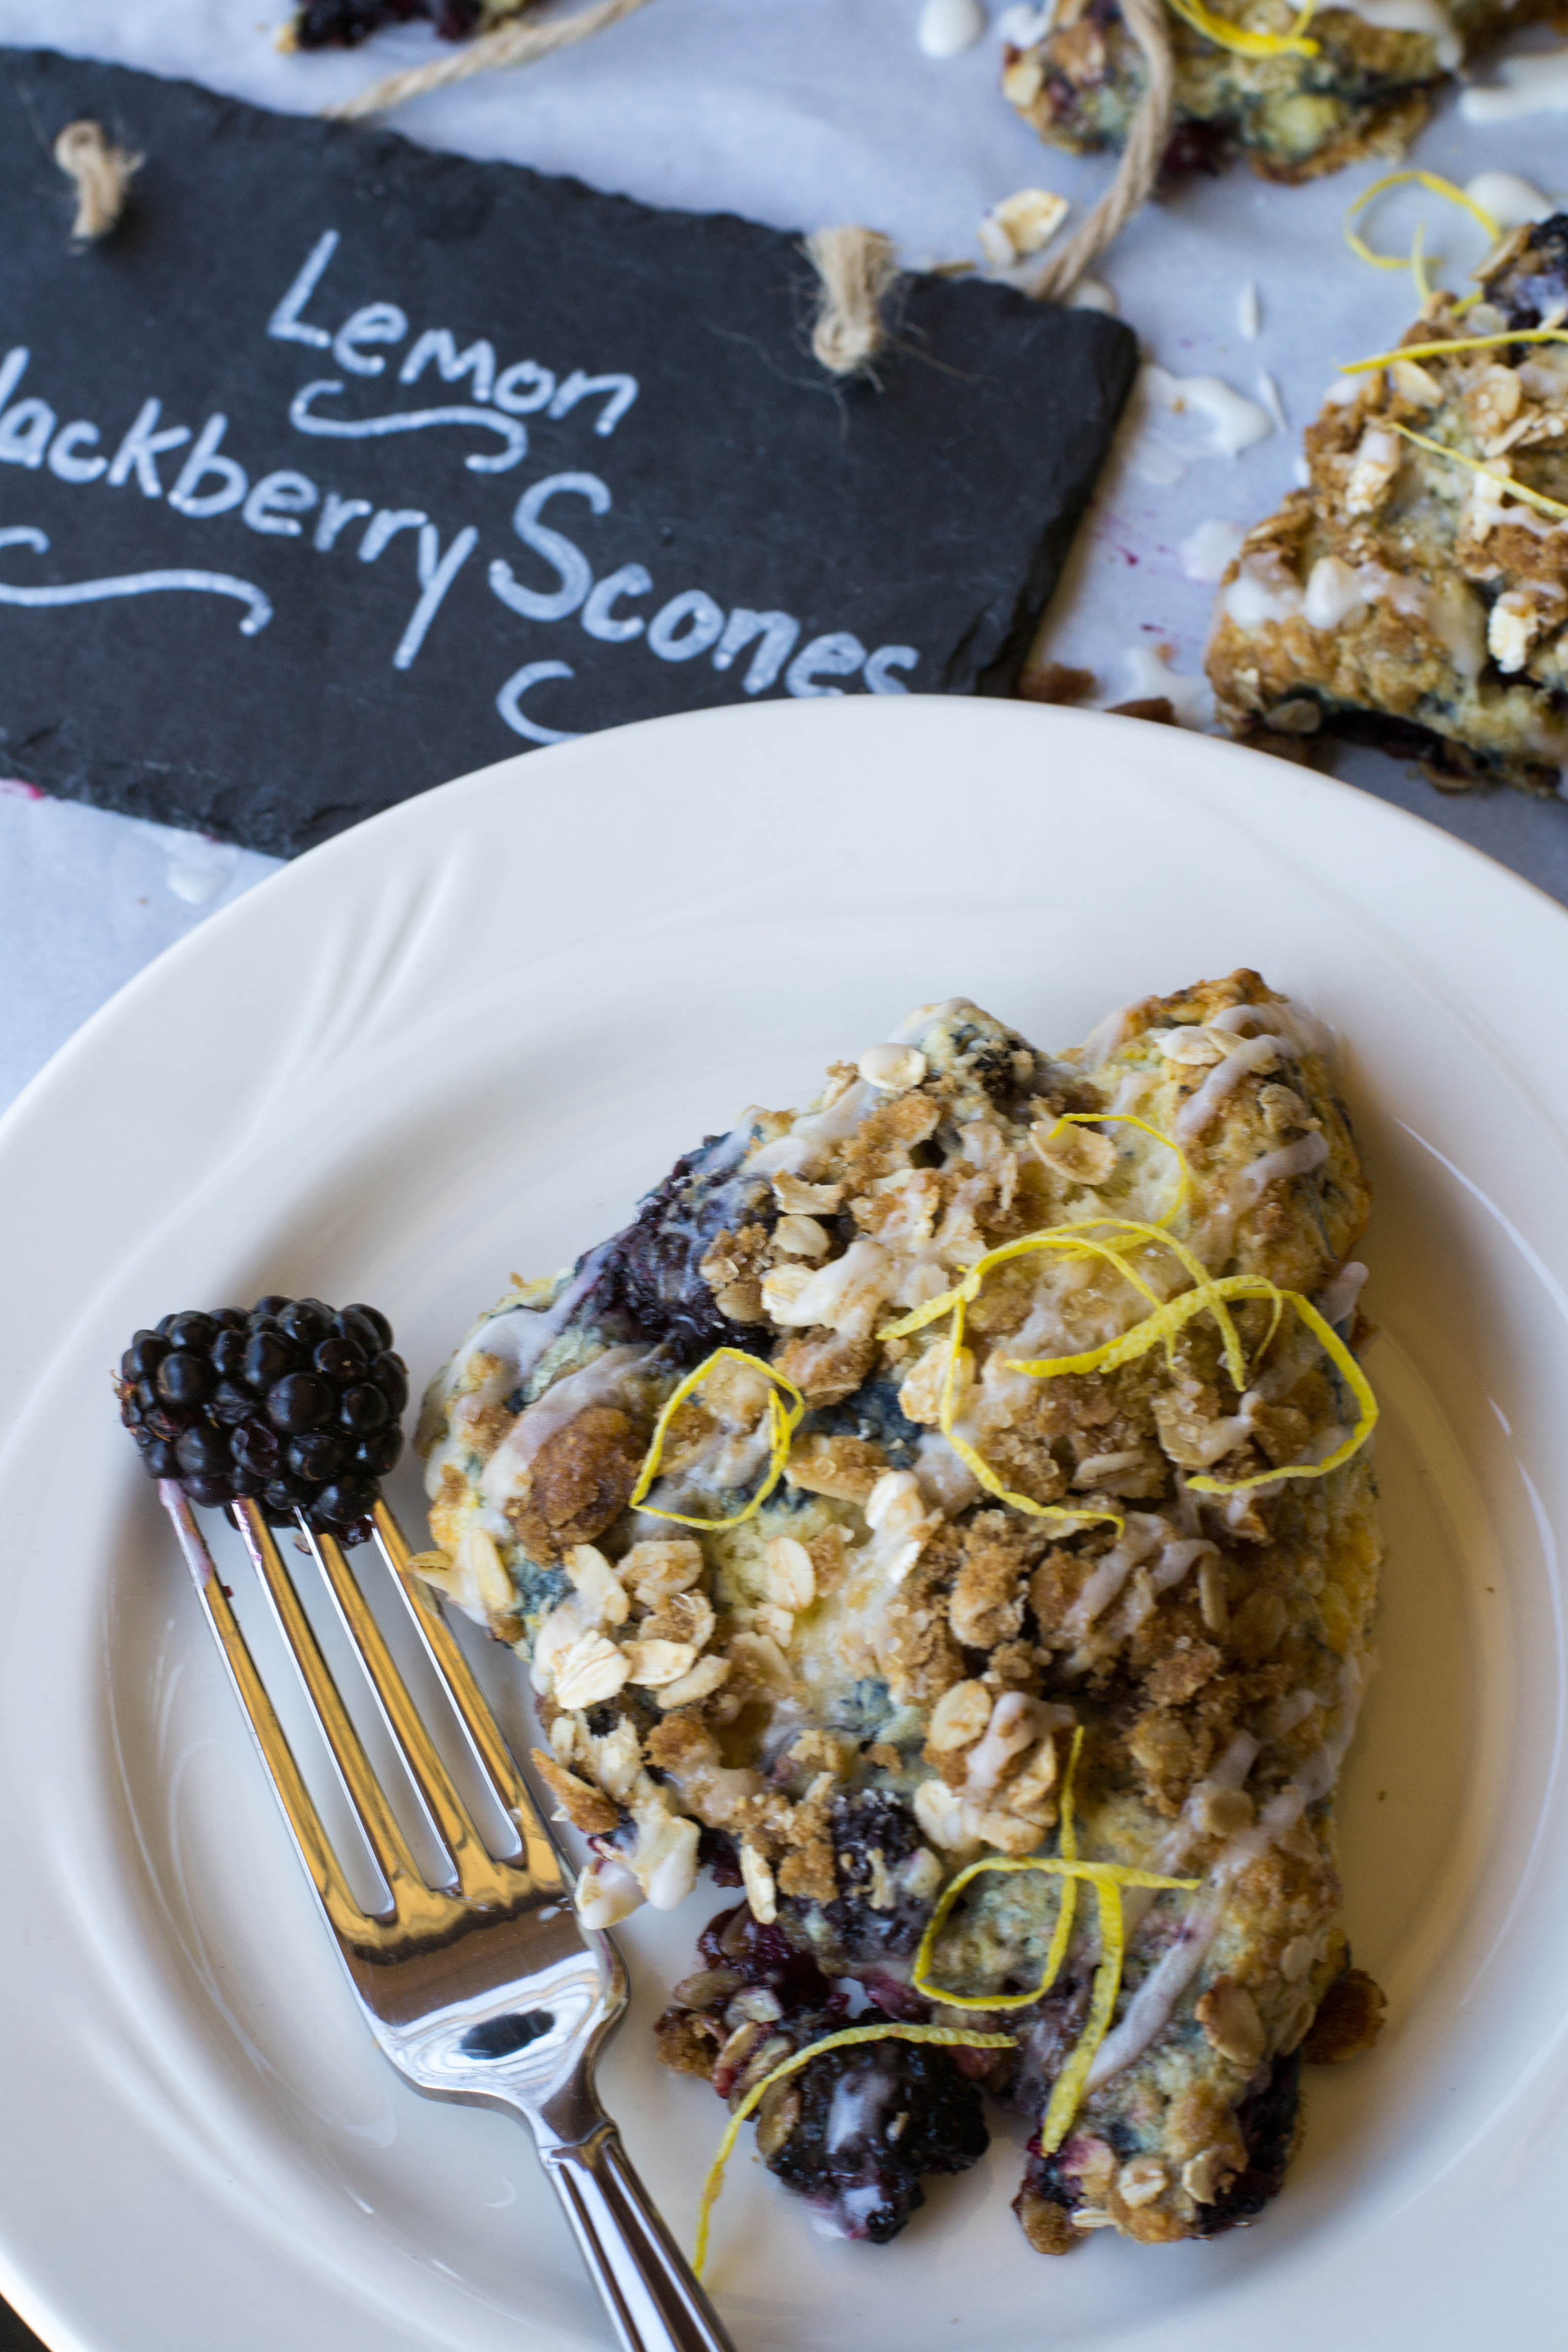
I found a new grocery store……..the produce section rocks! How about blackberries …….. Lemon Blackberry Scones.

Lemon Blackberry Scones

So, I go to this new grocery store……..I step inside…….grab a cart………my eyes glaze over! I kid you not……..the produce section was HUGE!!! And boy howdy, they had everything. I can’t wait to try some of the more unusual things I found……..but, that’s for another time.

They had blackberries for 99 cents a pint……I bought two! I wasn’t sure what I was going to do with them but they looked luscious.

Lemon Blackberry Scones

Now, it’s Sunday morning, what to have for breakfast? The weather is now finally turning nice maybe some coffee and scones, on the veranda…….ok we don’t have a veranda, but you get the idea.

I also bought some beautiful lemons at my new favorite store…..it was a match made in heaven. Just a slight hint of lemon brought out the beauty in the berries, plus they color coordinate……I’m kinda matchy, matchy.

Lemon Blackberry Scones

I like a crunchy topping on muffins, so why not scones, a little bit of oatmeal…..makes them healthy right?

And what scone is complete without a drizzle of glaze. Lemon added just the right zing to top of these beautiful, bursting with berries scones.

For your next Sunday breakfast on your veranda …….or wherever you eat breakfast, try my Lemon Blackberry Scones.

Lemon Blackberry Scones

Oh yeah…….they are great warmed up for an grab and go breakfast on Monday morning, when you are running late…….

Print
clock clock iconcutlery cutlery iconflag flag iconfolder folder iconinstagram instagram iconpinterest pinterest iconfacebook facebook iconprint print iconsquares squares iconheart heart iconheart solid heart solid icon

Lemon Blackberry Scones

  • Author: Marty Boyd
  • Yield: 8 1x

Ingredients

Scale
  • 2 ¼ cups flour
  • 2 baking powder
  • ½ teaspoons salt
  • ½ teaspoons baking soda
  • 1/4 cup sugar
  • ½ cup cold butter, grated
  • ¾ cup buttermilk
  • 1 egg
  • 1 cup blackberries
  • grated zest from lemon
  • Streusel Topping:
  • ¼ cup oats
  • ¼ cup brown sugar
  • 1 tablespoon butter, melted
  • 1 tablespoon flour
  • Lemon Glaze:
  • ½ cup freshly squeezed lemon juice
  • 2 cups powdered sugar
  • 1 tablespoon butter, melted

Instructions

  1. Preheat oven to 400 F. Sift the dry ingredients together. Grate the cold butter into the dry ingredients (using a box grater makes the butter easy to blend into the dry ingredients), add the lemon zest. Using your fingers or a pastry cutter, work the butter into the dry ingredients until it is the size of peas.
  2. Add the blueberries and toss with the flour.
  3. Mix together the buttermilk and egg and add to the dry ingredients. Fold mixture together gently, being careful not to break the berries.
  4. Press dough into a large circle on a flour surface. Cut out dough into 8 triangles.
  5. Mix the streusel ingredient together in a small bowl. Sprinkle streusel on top of the triangles and place on a cookie sheet covered in parchment paper.
  6. Bake scones for 18 -20 min.
  7. Mix together the glaze ingredients adding extra powdered sugar to get the consistency you like for a glaze. Let scones cool a bit before drizzling with the lemon glaze. Serve while warm.


Pretzel Crust Strawberry Pie

Nothing says Spring like Pretzel Crust Strawberry Pie.

Pretzel Crust Strawberry Pie

Strawberries signal the start of the Spring season of food. Heart-shaped, brightly red, sweet, juicy and luscious all come to mind when describing strawberries.

Strawberries have the greatest fragrance. The scent is sweet, fresh and a tart. You can just smell them when you walk by them at the grocery store…..ahhhhh!

Pretzel Crust Strawberry Pie

Strawberries are considered one of the healthiest fruits. Packed with antioxidants, essential vitamins and minerals, they are also sodium, cholesterol and fat free. Strawberries have only
54 calories in a cup, so they are a great snack.

Of course in Pretzel Crust Strawberry Pie there are a few more calories, but they are well worth it……..every single calorie is soooooo worth it.

Pretzel Crust Strawberry Pie

Everyone is familiar with Strawberry Pretzel Salad, a potluck staple. Well this pie is a take on that recipe.

A pretzel and vanilla wafer crust. Sweet and salty. And simple……just pretzels, vanilla wafer cookies, and butter. Mix it up, press into a pie dish, bake and cool.

Pretzel Crust Strawberry Pie

I like to keep the berries whole. Just cut the stems off and set cut side down in the cooled crust. It make a beautiful presentation, but if you prefer you can slice the berries.

We made this pie every Spring when I worked at the grocery store, it was a staple. A sugar, cornstarch, water mixture is brought to a boil and thickened. Strawberry Jello is added and then the mixture is poured over the berries in the cooled pretzel crust.

Pretzel Crust Strawberry Pie

Place in the frig overnight to set up. When you are ready to serve, garnish with whipped topping. In an effort to fancy smancy it up, you can also used a berry and a pretzel piece for that picture perfect look.

It’s Springtime….even if Mother Nature is not cooperating, so hurry her along and make a Pretzel Crust Strawberry Pie!!

Pretzel Crust Strawberry Pie

Print
clock clock iconcutlery cutlery iconflag flag iconfolder folder iconinstagram instagram iconpinterest pinterest iconfacebook facebook iconprint print iconsquares squares iconheart heart iconheart solid heart solid icon

Pretzel Crust Strawberry Pie

  • Author: Marty Boyd
  • Yield: 8 1x

Ingredients

Scale
  • 1 recipe Pretzel Crust (see below)
  • 2 pints strawberries
  • 2 1/2 tbsp Cornstarch
  • 1 1/4 cup Sugar
  • 1 1/2 cup Water
  • 1 box Strawberry Gelatin (like Jell-O)
  • Crust
  • 1 cup Crushed Pretzels
  • 1 cup Crushed Vanilla Wafers
  • 1/3 cup Melted Butter

Instructions

  1. Preheat oven to 350.
  2. Mix pretzels and vanilla wafers in melted butter.
  3. Press into a pie pan.
  4. Bake at 350 degrees for 12 minutes. Allow to cool.
  5. Cut the stems off of strawberries and place stem side down in cooled pie crust.
  6. Stir together sugar and cornstarch, add water and bring to a boil.
  7. Simmer, stirring constantly, until thickened.
  8. Remove from heat, add Jell-O and stir until dissolved.
  9. Pour mixture over strawberries.
  10. Refrigerate until set.
  11. Decorate with whipped topping.


Baked Feta

Sunday Snack day……Baked Feta please!!!

Baked Feta

Let’s have a feta lesson……..
According to Good Housekeeping: Feta, a classic Greek cheese traditionally made from sheep’s or goat’s milk, is now available in a milder, less bitter version made from cow’s milk. But whether you choose a creamy Bulgarian feta or a firmer Greek or American one, the zesty cheese is more than a wonderful addition to vegetable and fruit salads. You can use it in just about any recipe that calls for cheese. Add it to cooked rice or tomato-based pastas; use it as a topping for baked potatoes or as a filling for omelets; crumble it over tomato sandwiches; or simply serve it as a table cheese along with olives, bread, grilled vegetables, and salami.

Baked Feta

Feta that is sold crumbled should be stored in an airtight container and used within a few days. When it’s sold in chunks in vacuum-sealed plastic packages, it should be stored wrapped in plastic or in airtight containers and used within 1 to 2 weeks. Feta that comes immersed in a brine solution of water and salt should be stored in its brine and used within 1 to 2 weeks after opening.

I enjoy the tangy saltiness of feta. I have used it in a variety of different dishes, even pizza. But I wanted to make dip.I didn’t want a mayo or olive oil laden dip, just the cheese please.

Baked Feta

Feta pairs very well with red peppers, and I happen to love roasted red peppers. I buy them already roasted. I, as you who follow my blog know, can have a lazy streak…..especially when you can buy a quality product, and someone else has done the work! Cause let’s be real, roasting red peppers is a big fat mess.

I did get a little fancy making a broth for the cheese to bake in…….I can be fancy sometimes. But the broth is a vegetable broth and there is no shame in just buying it. And truth be told, the only reason I made it was I had some veggies that needed to be used.

Baked Feta

Mirepoix is the fancy French culinary term for a combination of diced carrots, onions and celery sautéed in butter and used as an aromatic base to flavor sauces, soups and stews. Even a small amount can significantly contribute to the overall flavor of a finished dish.

I used olive oil instead but you get the idea. I added some water and oregano, and some lemon zest. Simmered to make a veggie broth.

Baked Feta

I used a cast iron skillet, but any oven proof skillet will do. I just liked the contrast of the white feta and the black skillet. The feta block went into the skillet and I poured just enough of the broth around to cover the bottom of the pan. Top the cheese with the roasted red peppers and baked in a 400* oven for about 10 minutes. Garnished with green onions and serve with pita chips.

I really like the look and taste of the Baked Feta. Pretty enough for a party and rustic enough for just hanging around on a Sunday snack day. Best thing…. this can be reheated in the same skillet, so reserve that broth for a repeat Baked Feta.

Baked Feta

Print
clock clock iconcutlery cutlery iconflag flag iconfolder folder iconinstagram instagram iconpinterest pinterest iconfacebook facebook iconprint print iconsquares squares iconheart heart iconheart solid heart solid icon
Baked Feta

Baked Feta

  • Author: Marty Boyd
  • Yield: 6 1x

Ingredients

Scale
  • Broth
  • 2 sprigs fresh oregano
  • 1 rib celery, roughly chopped
  • 1 medium carrot, roughly chopped
  • 1 small white onion, roughly chopped
  • 1 teaspoon freshly grated lemon zest
  • Salt
  • Baked Feta
  • 1 red bell pepper, roasted, diced (I used a jarred roasted red pepper)
  • 11/2 block of feta
  • 2 tablespoons green onion, thinly sliced
  • Pita chips to serve

Instructions

  1. Place oregano, celery, carrots, onions, lemon zest, salt to taste, and 3 cups water into a large pot and bring to a boil. Reduce heat and simmer for 30 minutes. Remove from heat, cover, and let steep for 15 minutes. Strain broth through a fine-mesh sieve into measuring cup, discarding solids. Keep broth warm.
  2. For the baked feta: Preheat the oven to 400°.
  3. Place the feta in a small ovenproof nonstick skillet( I used a cast iron skillet) and top with roasted red peppers. Pour just enough of reserved broth around the feta to cover the bottom of the skillet. Bake until softened, 8–10 minutes.
  4. Garnish with green onions and serve with pita chips.
  5. Serve immediately.