Baked Feta

Sunday Snack day……Baked Feta please!!!

Baked Feta

Let’s have a feta lesson……..
According to Good Housekeeping: Feta, a classic Greek cheese traditionally made from sheep’s or goat’s milk, is now available in a milder, less bitter version made from cow’s milk. But whether you choose a creamy Bulgarian feta or a firmer Greek or American one, the zesty cheese is more than a wonderful addition to vegetable and fruit salads. You can use it in just about any recipe that calls for cheese. Add it to cooked rice or tomato-based pastas; use it as a topping for baked potatoes or as a filling for omelets; crumble it over tomato sandwiches; or simply serve it as a table cheese along with olives, bread, grilled vegetables, and salami.

Baked Feta

Feta that is sold crumbled should be stored in an airtight container and used within a few days. When it’s sold in chunks in vacuum-sealed plastic packages, it should be stored wrapped in plastic or in airtight containers and used within 1 to 2 weeks. Feta that comes immersed in a brine solution of water and salt should be stored in its brine and used within 1 to 2 weeks after opening.

I enjoy the tangy saltiness of feta. I have used it in a variety of different dishes, even pizza. But I wanted to make dip.I didn’t want a mayo or olive oil laden dip, just the cheese please.

Baked Feta

Feta pairs very well with red peppers, and I happen to love roasted red peppers. I buy them already roasted. I, as you who follow my blog know, can have a lazy streak…..especially when you can buy a quality product, and someone else has done the work! Cause let’s be real, roasting red peppers is a big fat mess.

I did get a little fancy making a broth for the cheese to bake in…….I can be fancy sometimes. But the broth is a vegetable broth and there is no shame in just buying it. And truth be told, the only reason I made it was I had some veggies that needed to be used.

Baked Feta

Mirepoix is the fancy French culinary term for a combination of diced carrots, onions and celery sautéed in butter and used as an aromatic base to flavor sauces, soups and stews. Even a small amount can significantly contribute to the overall flavor of a finished dish.

I used olive oil instead but you get the idea. I added some water and oregano, and some lemon zest. Simmered to make a veggie broth.

Baked Feta

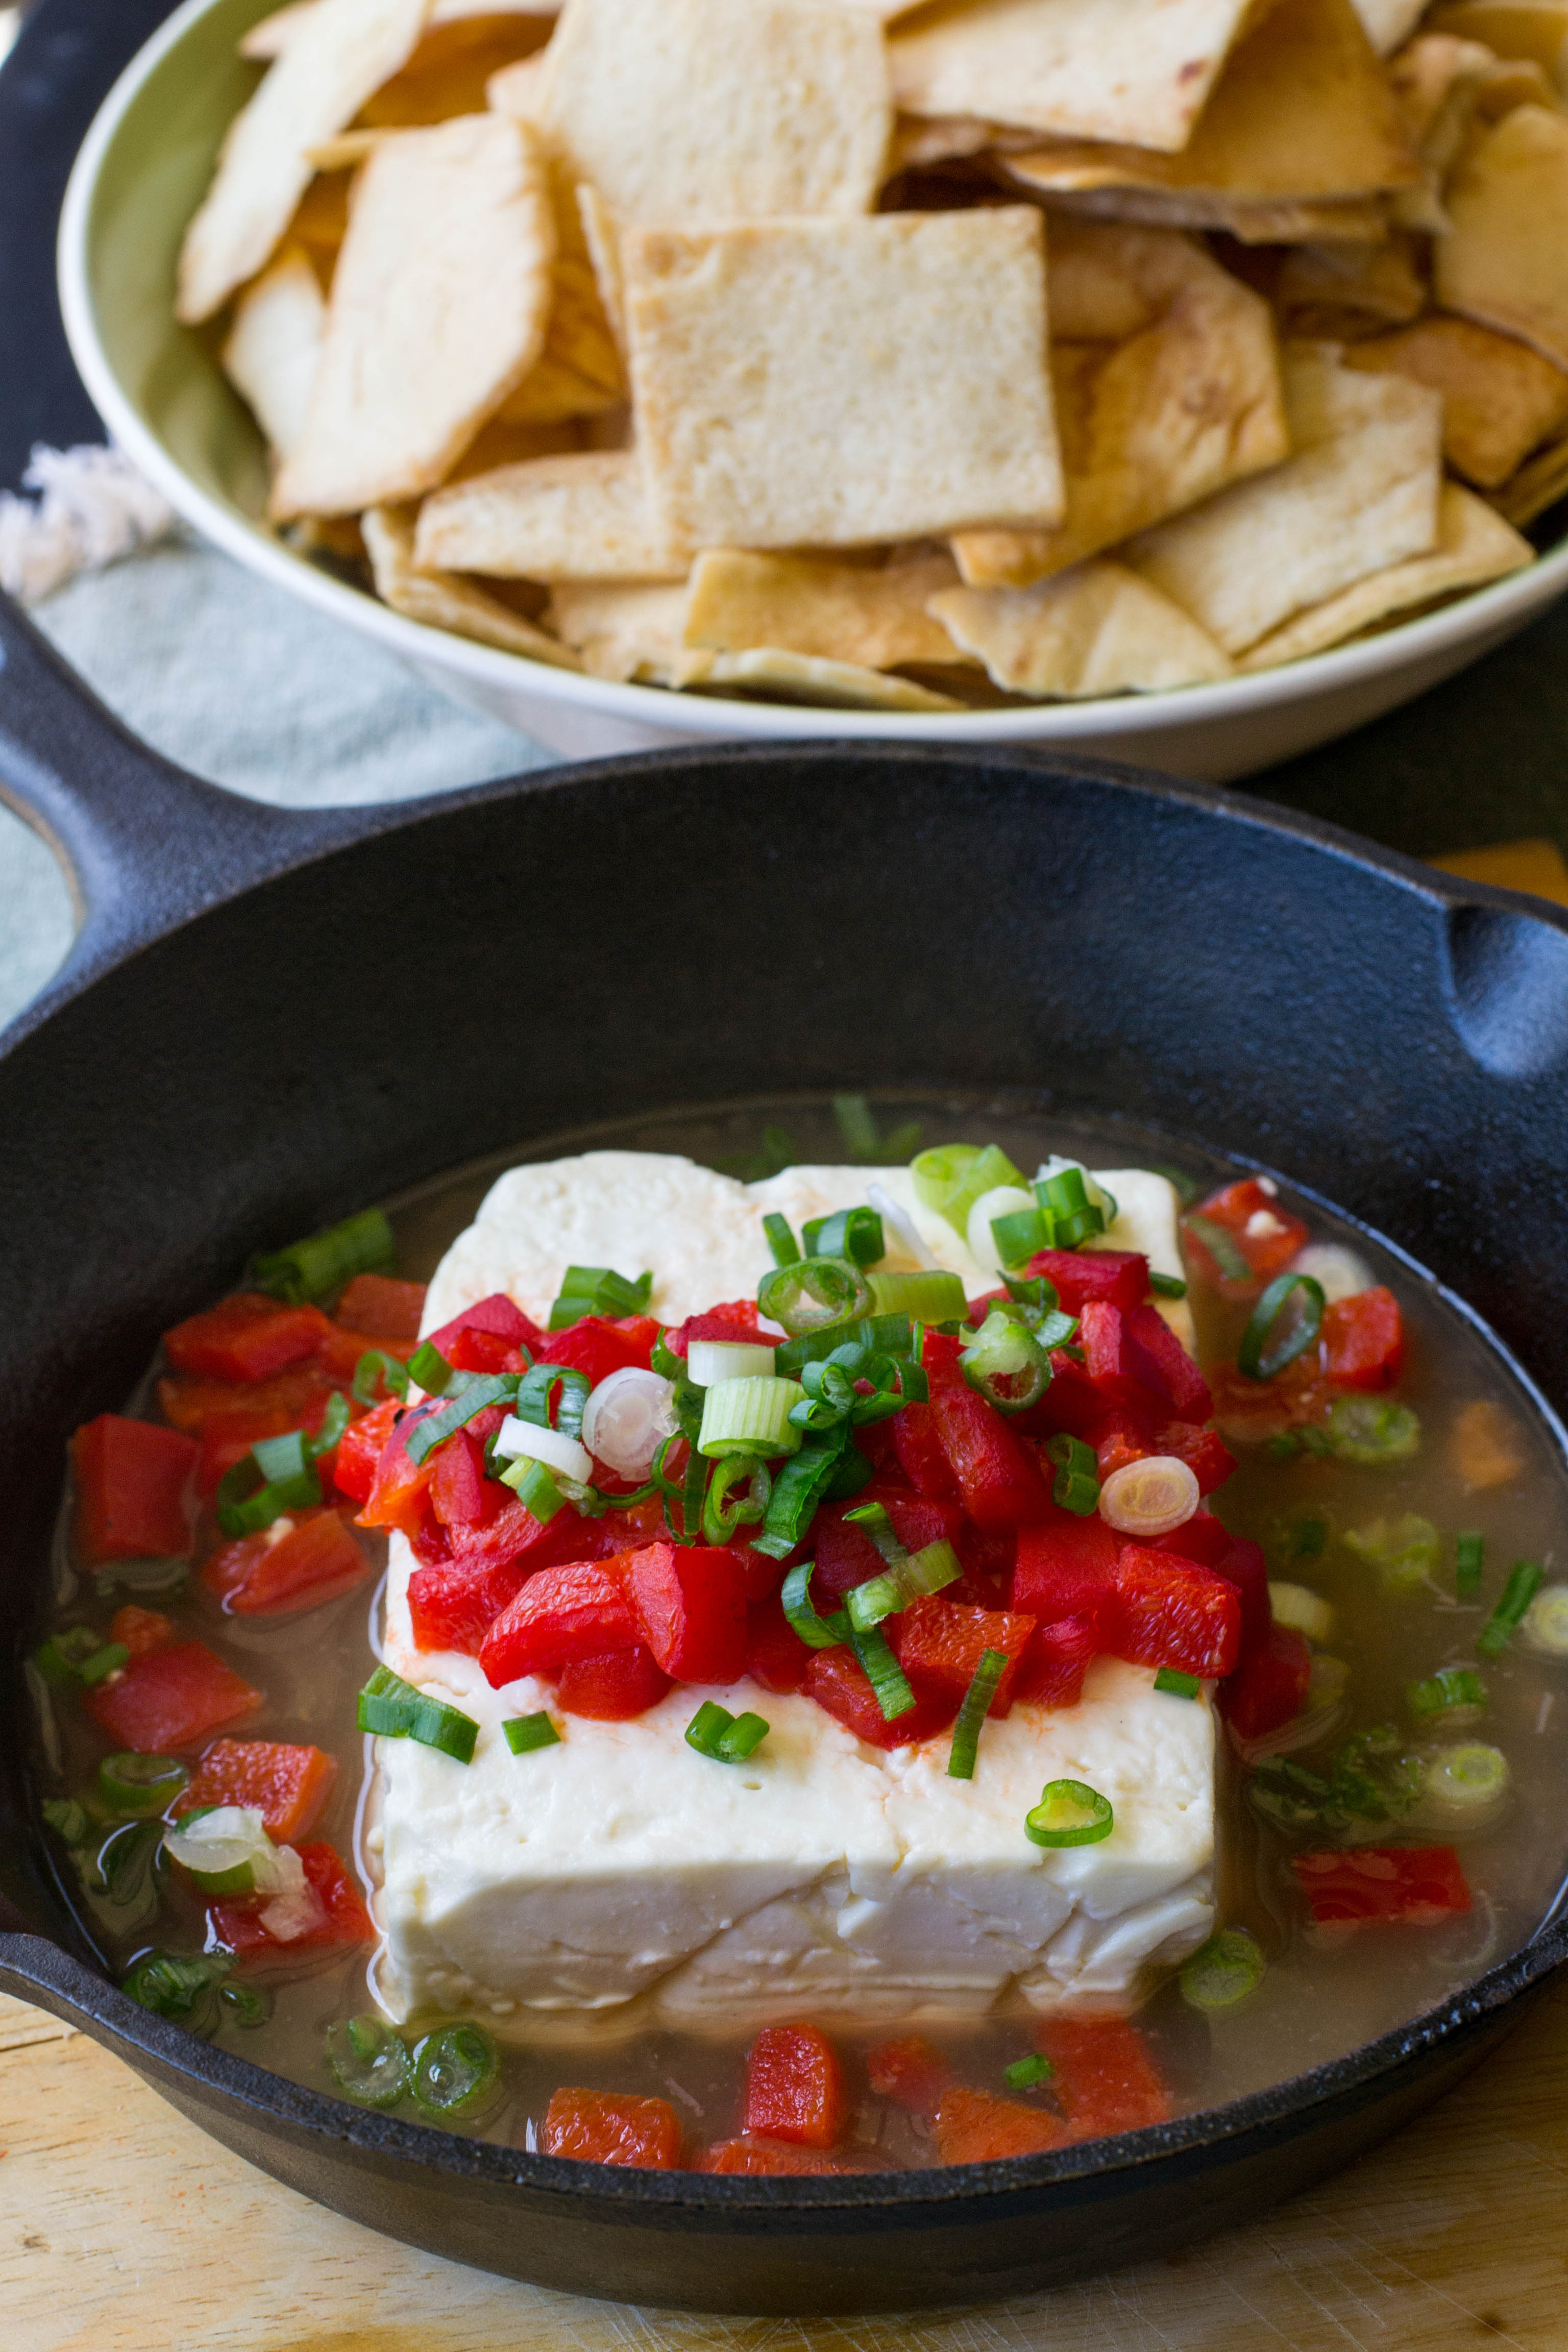
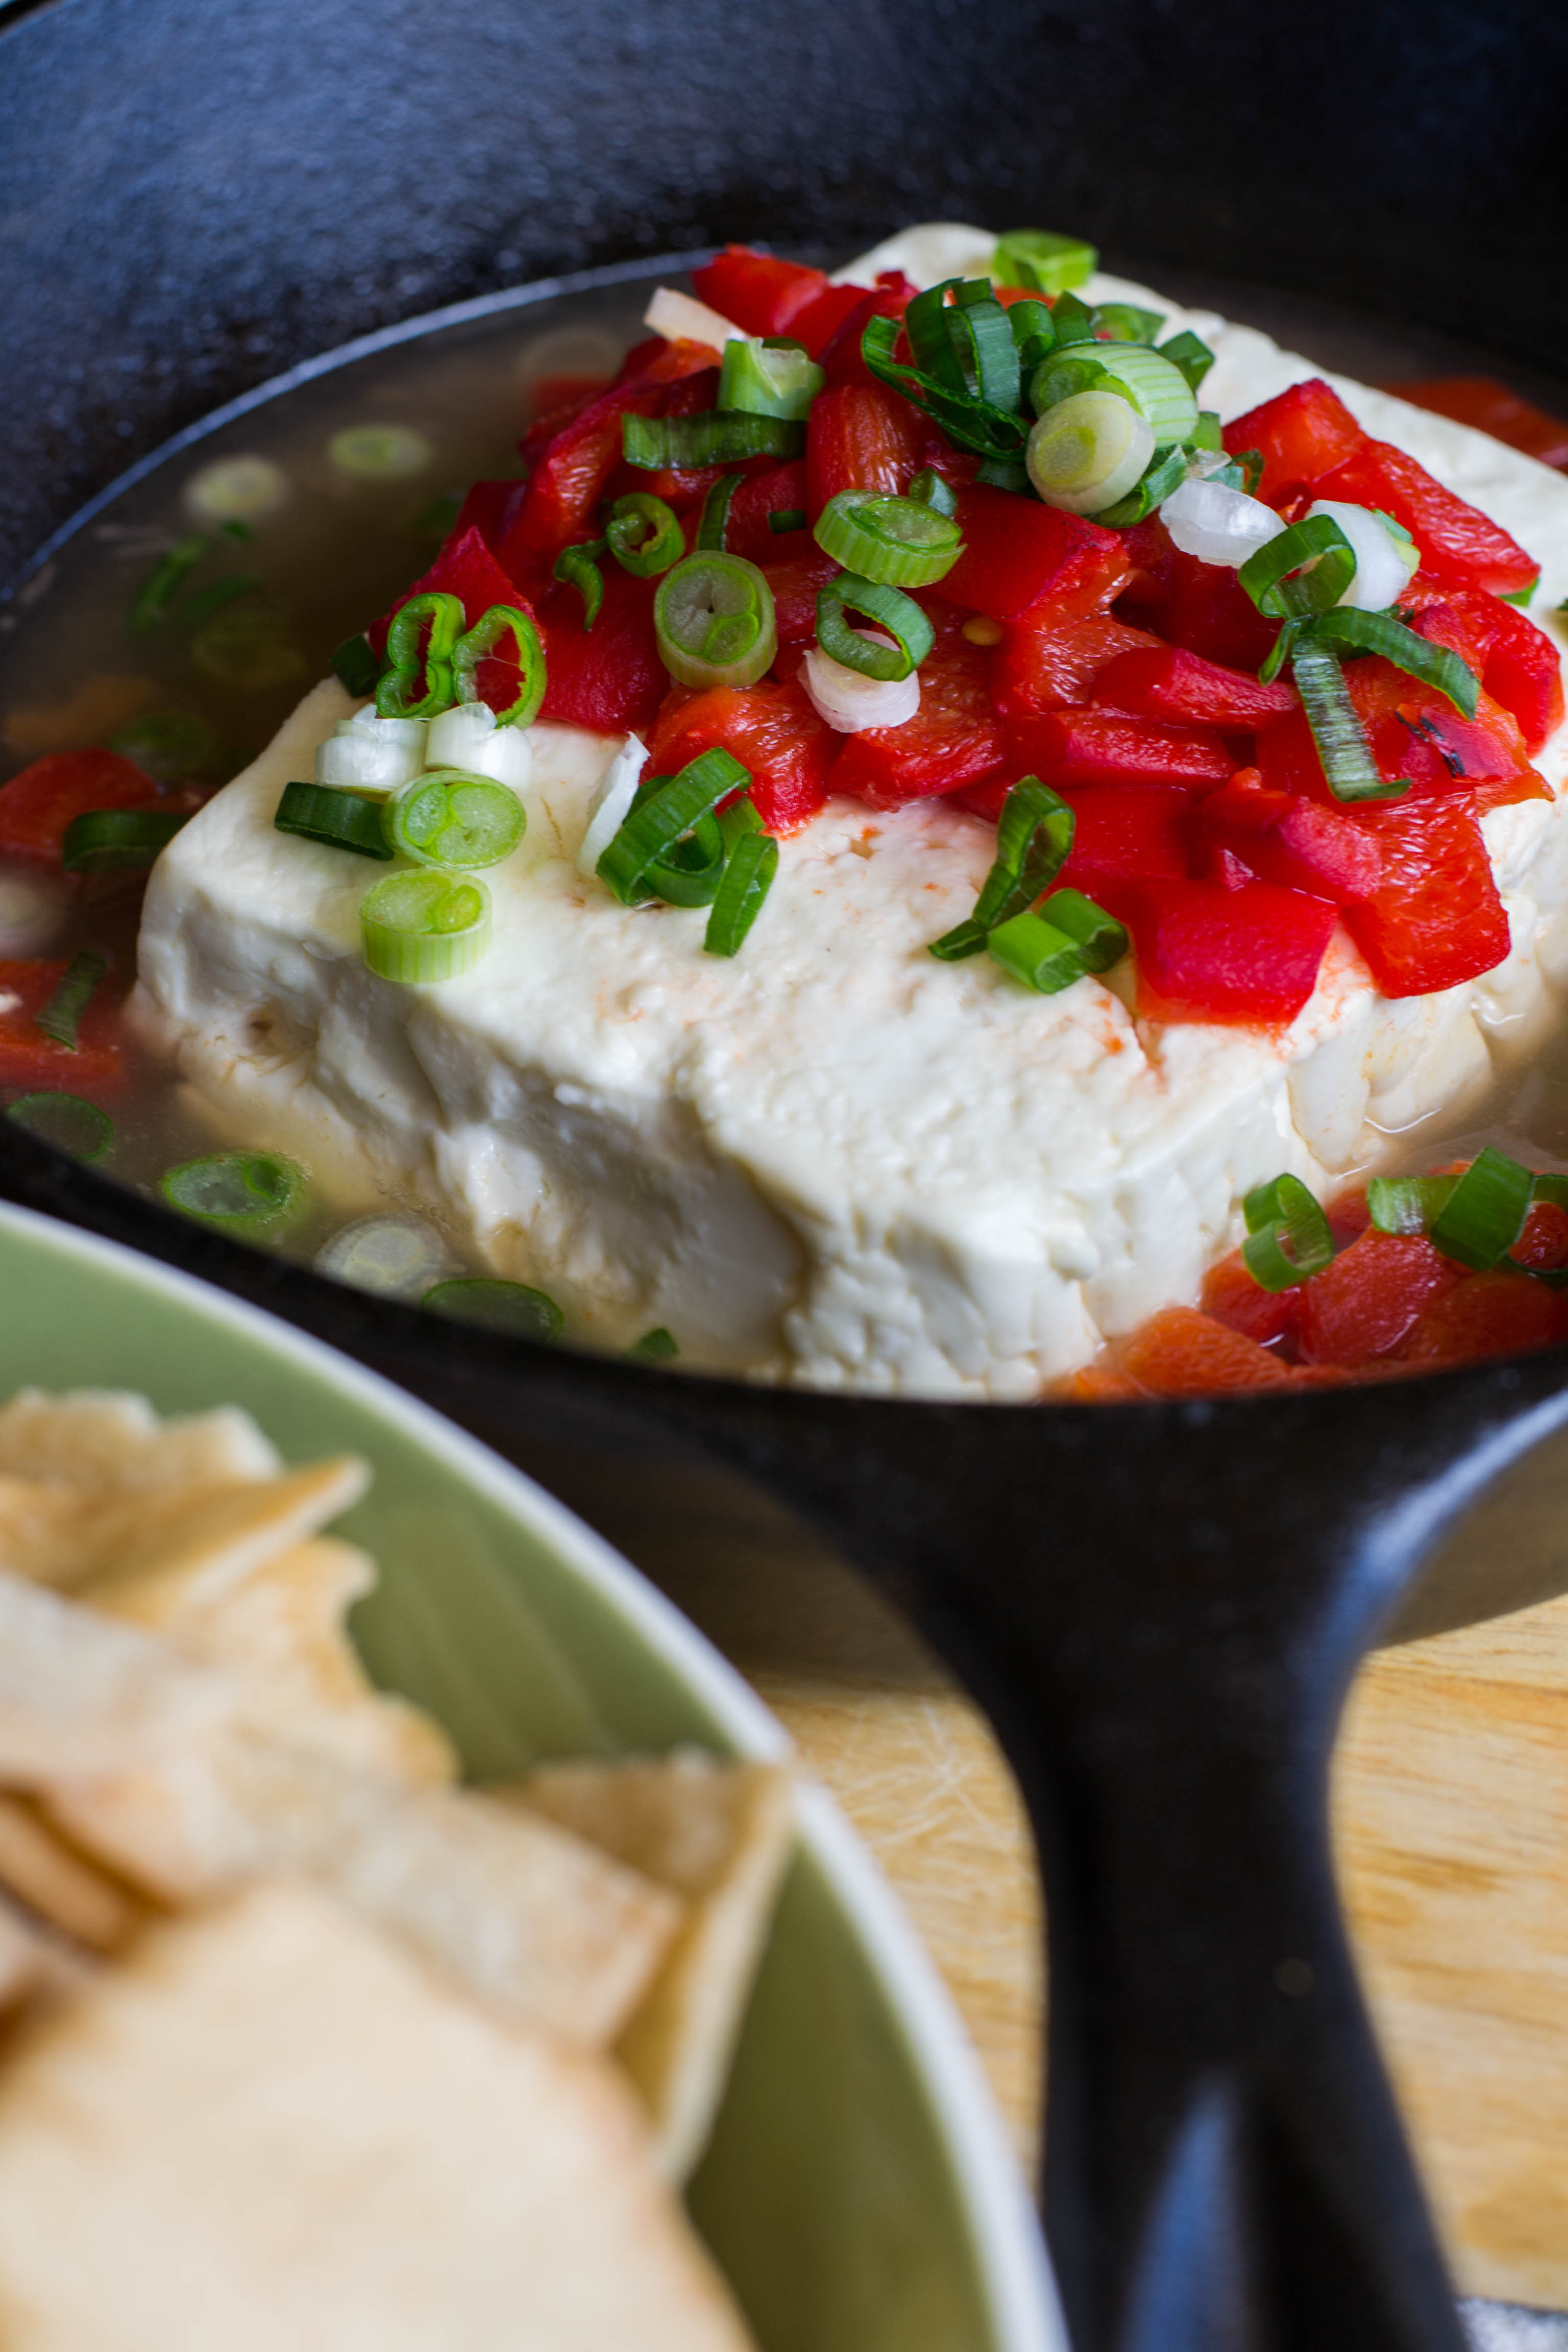
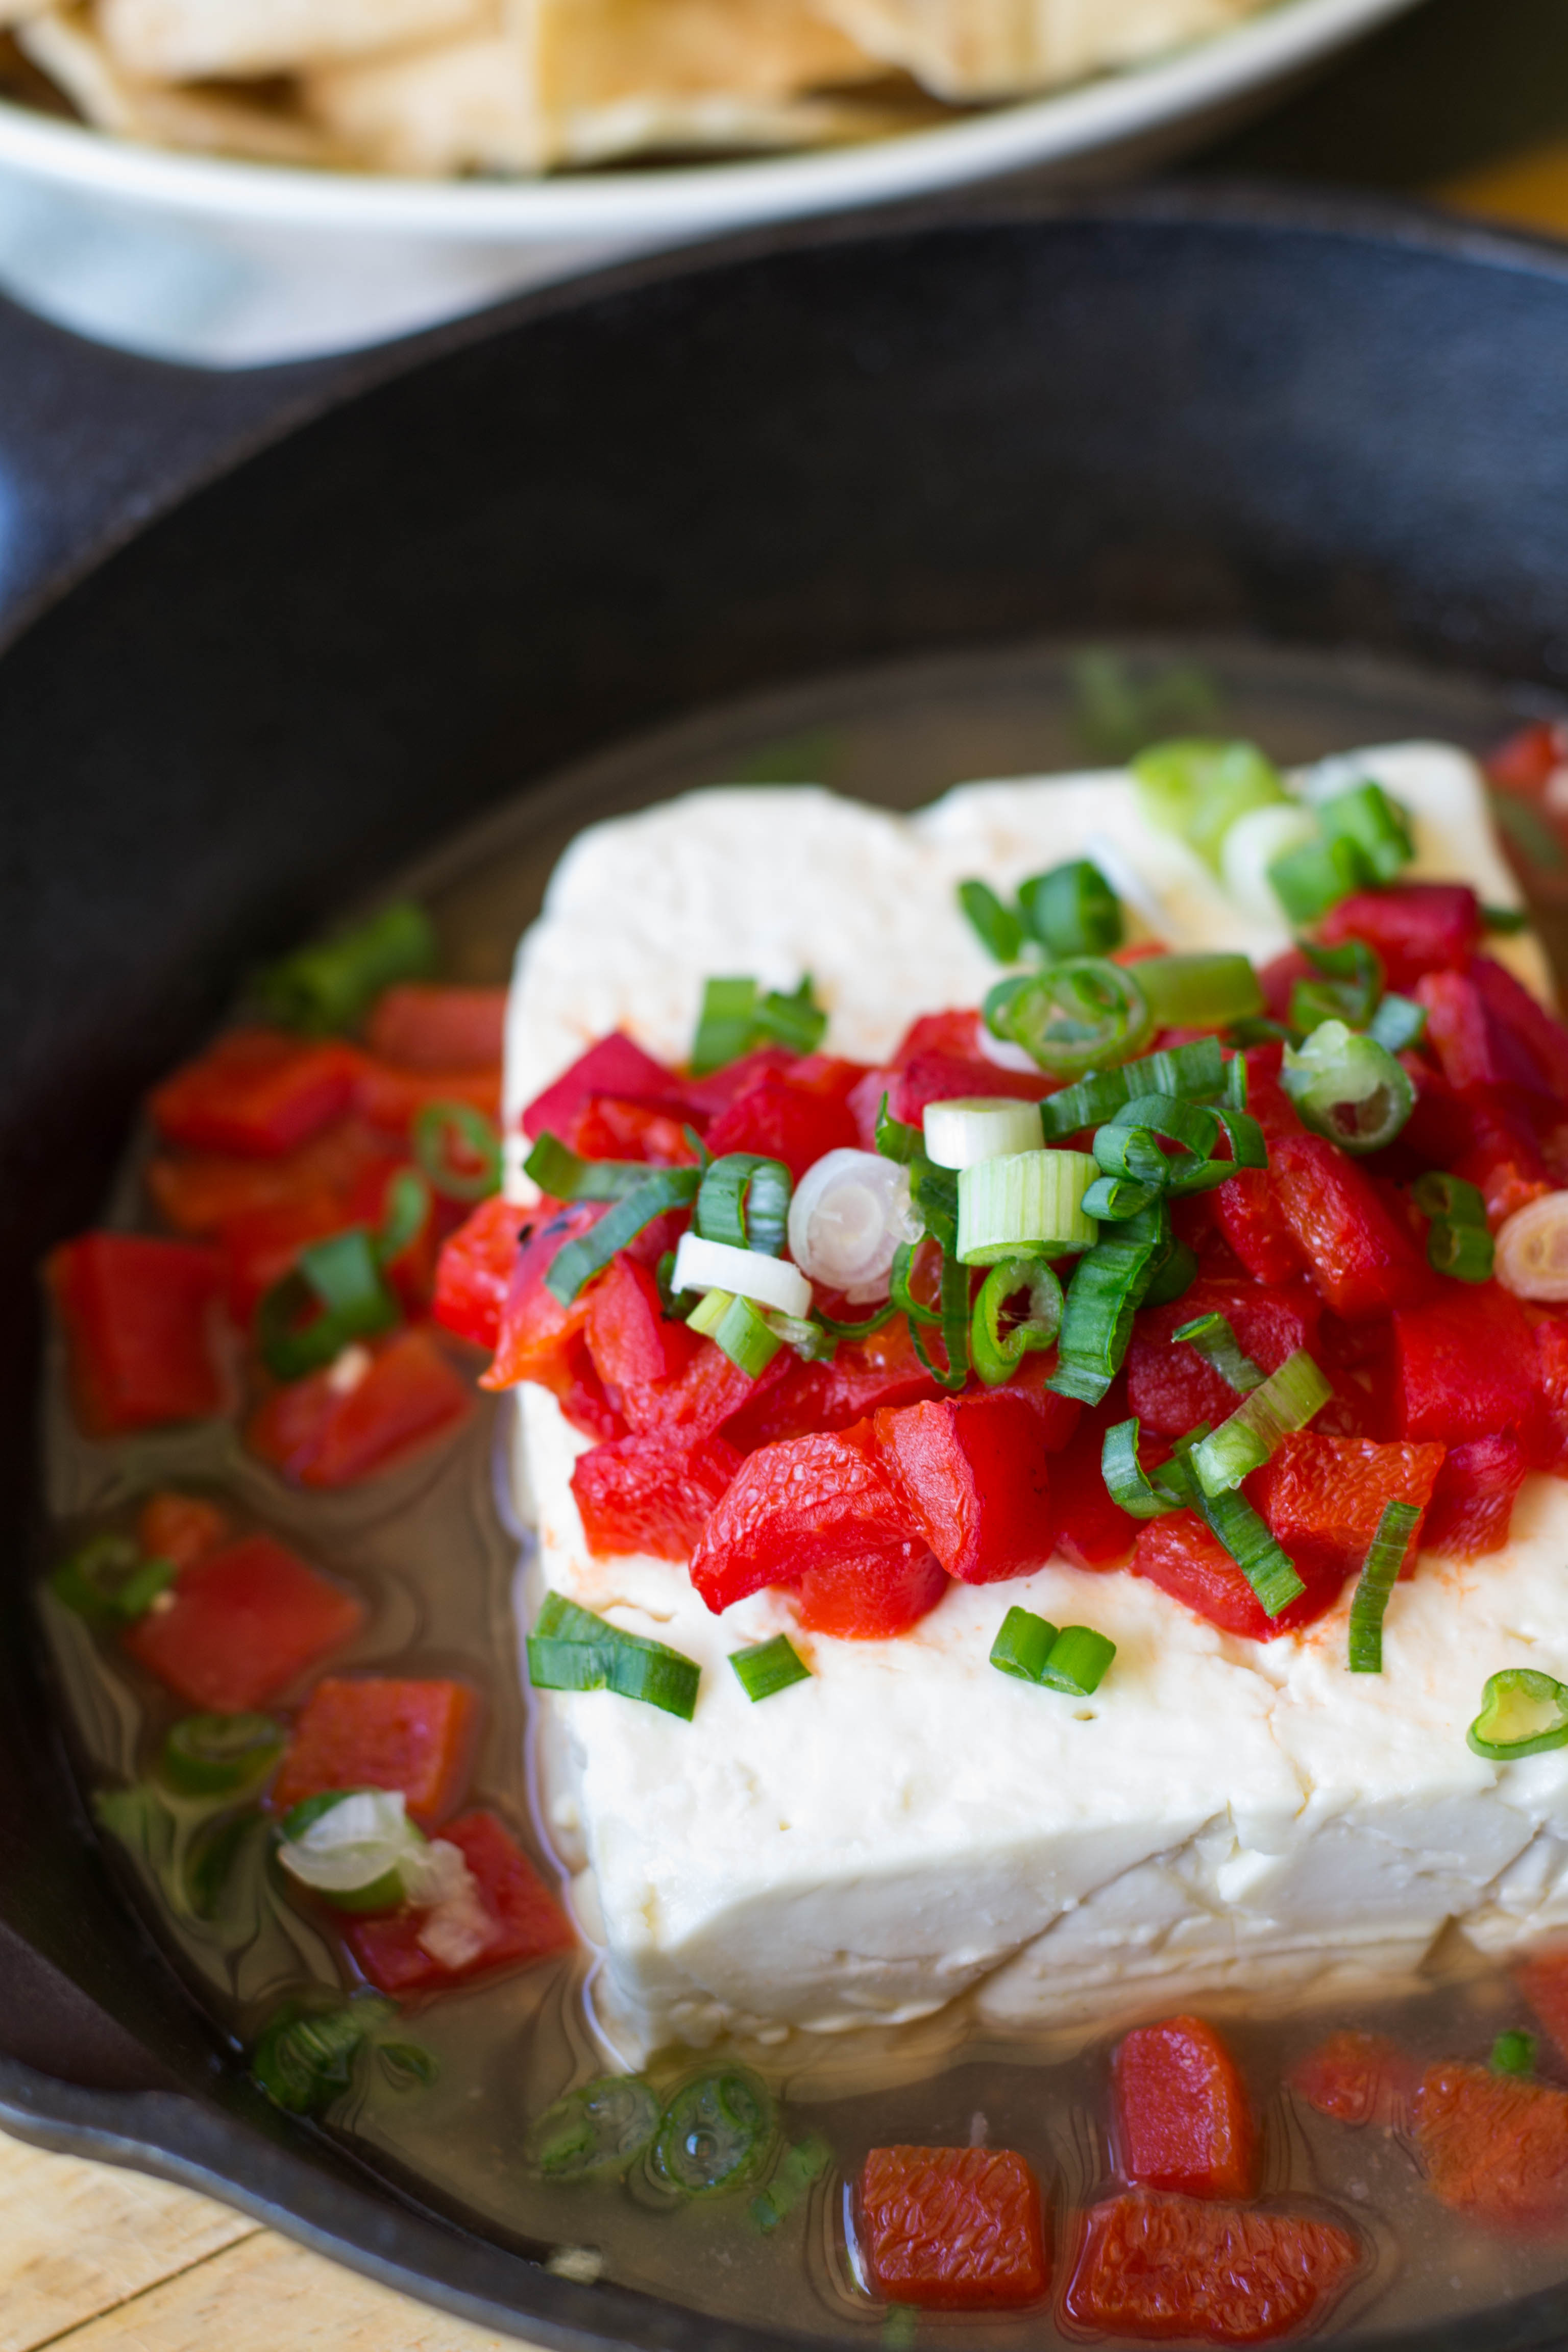
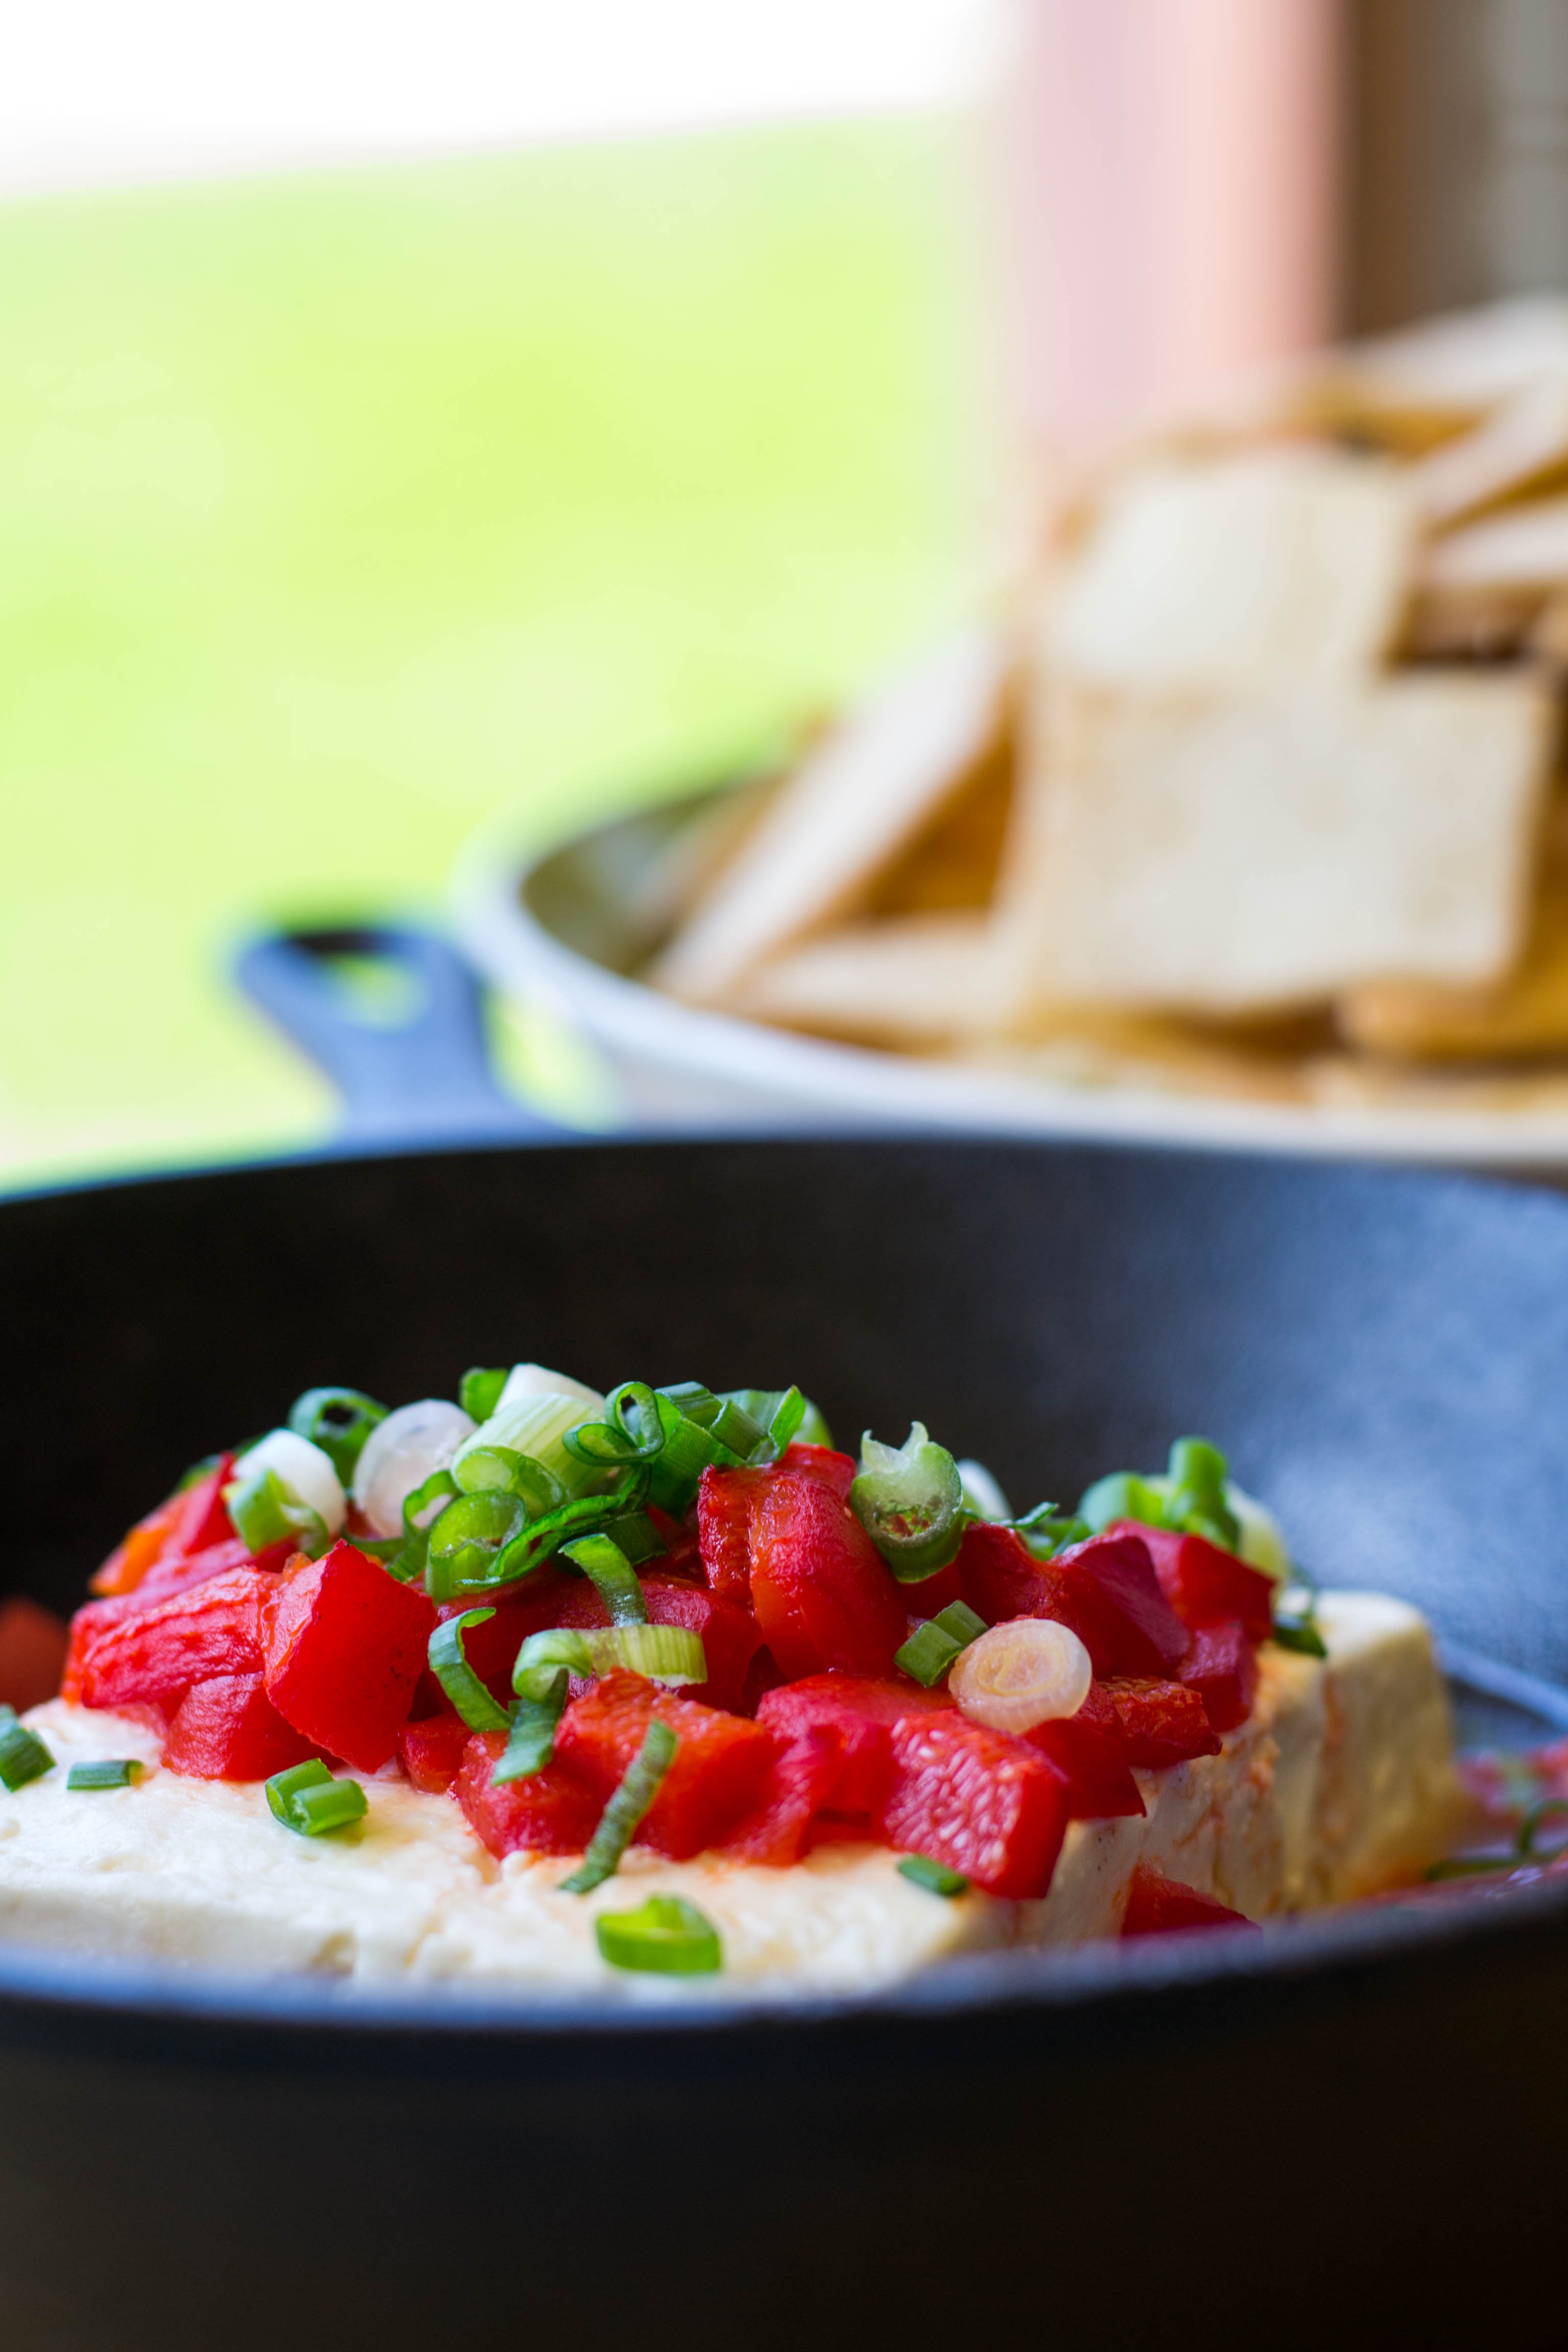
I used a cast iron skillet, but any oven proof skillet will do. I just liked the contrast of the white feta and the black skillet. The feta block went into the skillet and I poured just enough of the broth around to cover the bottom of the pan. Top the cheese with the roasted red peppers and baked in a 400* oven for about 10 minutes. Garnished with green onions and serve with pita chips.

I really like the look and taste of the Baked Feta. Pretty enough for a party and rustic enough for just hanging around on a Sunday snack day. Best thing…. this can be reheated in the same skillet, so reserve that broth for a repeat Baked Feta.

Baked Feta

Print
clock clock iconcutlery cutlery iconflag flag iconfolder folder iconinstagram instagram iconpinterest pinterest iconfacebook facebook iconprint print iconsquares squares iconheart heart iconheart solid heart solid icon
Baked Feta

Baked Feta

5 Stars 4 Stars 3 Stars 2 Stars 1 Star No reviews
  • Author: Marty Boyd
  • Yield: 6

Ingredients

Scale
  • Broth
  • 2 sprigs fresh oregano
  • 1 rib celery, roughly chopped
  • 1 medium carrot, roughly chopped
  • 1 small white onion, roughly chopped
  • 1 teaspoon freshly grated lemon zest
  • Salt
  • Baked Feta
  • 1 red bell pepper, roasted, diced (I used a jarred roasted red pepper)
  • 1-1/2 block of feta
  • 2 tablespoons green onion, thinly sliced
  • Pita chips to serve


Instructions

  1. Place oregano, celery, carrots, onions, lemon zest, salt to taste, and 3 cups water into a large pot and bring to a boil. Reduce heat and simmer for 30 minutes. Remove from heat, cover, and let steep for 15 minutes. Strain broth through a fine-mesh sieve into measuring cup, discarding solids. Keep broth warm.
  2. For the baked feta: Preheat the oven to 400°.
  3. Place the feta in a small ovenproof nonstick skillet( I used a cast iron skillet) and top with roasted red peppers. Pour just enough of reserved broth around the feta to cover the bottom of the skillet. Bake until softened, 8–10 minutes.
  4. Garnish with green onions and serve with pita chips.
  5. Serve immediately.


Cranberry Almond Energy Bites

Spring Break is approaching it’s final days, then it’s back to school for the last of the 2015-2016 school year. I will need something to get my motor running……… Cranberry Almond Energy Bites.

Cranberry Almond Energy Bites

I am always running later than I want too! I start getting ready for school early enough, but somewhere between the shower and the door……..I think I enter a time warp, or fall into a black hole…….anyway, I am always running out the door.

But, I believe in the power of breakfast. After a good nights sleep you need to refuel your tank. But, for the running late me, it needs to be a grab and go, eat in the car kinda thing. Cranberry Almond Energy Bites are certainly that kind of breakfast.

Cranberry Almond Energy Bites

Loaded with oatmeal, almonds, and almond butter, you will have all the protein you need to start your day. Chia seeds and flax add an additional health boost and cranberries and coconut add a bit of sweetness.

Since I have been on Spring Break, and doing Spring Break things…..no alarm, a few extra hours of sleep…..it will be hard to get back into the groove.

Cranberry Almond Energy Bites

I have a plan, or I should say I made a plan. I made the Cranberry Almond Energy Bites this week, and I am already for that first day back to school. I can grab a couple of the bites and a cup of joe and head on out the door! Hopefully on time……..but, lets not get hysterical!

Cranberry Almond Energy Bites

If you need that make ahead grab and go breakfast, try these bites. A big shout out to The Creative Bite for the recipe I found on Pinterest.

For now, I plan on enjoying my last few days of Spring Break!!!

Cranberry Almond Energy Bites Collage

Print
clock clock iconcutlery cutlery iconflag flag iconfolder folder iconinstagram instagram iconpinterest pinterest iconfacebook facebook iconprint print iconsquares squares iconheart heart iconheart solid heart solid icon

Cranberry Almond Energy Bites

5 Stars 4 Stars 3 Stars 2 Stars 1 Star No reviews

Ingredients

Scale
  • 1 c. oatmeal
  • c. sliced almonds
  • c. sweetened shredded coconut
  • 1 Tbsp. ground flaxseed
  • ½ c. almond butter
  • ¼ c. honey
  • 1 Tbsp. chia seeds
  • c. dried cranberries, roughly chopped


Instructions

  1. Bake oatmeal, almonds and coconut for 8-10 minutes at 350°, stirring after 5 minutes. Allow the mixture to cool. (My coconut was already toasted so I did not add it to the oatmeal and almonds)
  2. In a medium bowl microwave the almond butter for 20-30 seconds until runny, add the baked mix along with flaxseed, honey, chia seeds and cranberries to the bowl.
  3. Form into 1.5″ balls and refrigerate. I used a small ice cream scoop to make sure they were uniform. Store in an airtight container refrigerated for up to one week or freezer for 3 months.

Notes

To make shaping the balls easier I sprayed my hands with coconut spray.
I also rolled them in extra coconut and almonds for a pretty look!


Pierogi Lasagna

Pierogi Lasagna is the best of two worlds, pasta and potatoes.

Pierogi Lasagna

The Polish are the originators of the pierogi. I love them, they can be eaten warm, cold, baked, fried or boiled.  They taste great on the second day, grilled on a frying pan with some butter. And pasta with mashed potatoes …..LOVE!

I have never made homemade pierogis, I traditionally buy them Mrs. T’s Pierogies makes an amazing assortment and are available in the freezer section of the grocery store.

Pierogi Lasagna

I tweaked a recipe from Mr. Food. Pierogi Lasagna. Mr. Food does super simple dishes, so I had to embellish a bit.

When I use the frozen pierogis I like to cook them in bacon, with onions and cabbage. So…….light bulb moment……why not add bacon, and cabbage to the recipe from Mr. Food?

The recipe is really simple! I used no boil noodles, I can never seem to boil lasagna noodles with any success……go figure.

Pierogi Lasagna

I did make my own mashed potatoes and added roasted garlic. Roasted garlic adds a mellow garlic flavor. Roasting garlic is super easy, just cut the top off of a garlic bulb, place it on a piece of tin foil, drizzle with olive oil, and balsamic vinegar. Close the foil around the garlic, and place in a 400* oven for about 45 minutes. Allow to cool, then squeeze the bulb to release the roasted, buttery, mild flavored garlic.

Fry up the bacon until crisp, reserving the fat. Set the cooked bacon aside. In the bacon fat cook the onions, and cabbage until just starting to brown. Set aside.

Pierogi Lasagna

To assemble place a layer of noodles in the bottom of a 13 X 9 inch baking dish, sprayed with non-stick cooking spray. Cover with 1/3 of the mashed potatoes, 1/4 of the cabbage, and 1/3 of the bacon. repeat the layers, ending with noodles and the remaining 1/4 cabbage/onion mixture.

Sprinkle with cheese and cover with foil. Bake at 350* for 35-45 minutes or until the noodles are cooked and the mixture is bubbly and hot. Allow to set for about 10 minutes, slice and serve.

Pierogi Lasagna is a hearty nod to a Polish favorite!

Pierogi Lasagna

Print
clock clock iconcutlery cutlery iconflag flag iconfolder folder iconinstagram instagram iconpinterest pinterest iconfacebook facebook iconprint print iconsquares squares iconheart heart iconheart solid heart solid icon

Pierogi Lasagna

5 Stars 4 Stars 3 Stars 2 Stars 1 Star No reviews
  • Author: Adapted from Mr. Food
  • Yield: 8

Ingredients

Scale
  • 12 no boil lasagna noodles
  • 1 pound bacon, diced and cooked crisp
  • 1/2 teaspoon salt
  • 2 large onions, onions, finely sliced
  • 1/2 head cabbage shredded
  • 1/2 teaspoon black pepper
  • 1 1/2 cups shredded Cheddar cheese
  • 6 cups warm garlic mashed potatoes, store-bought or homemade


Instructions

  1. Preheat oven to 350 degrees F. Spray a 9- x 13-inch baking dish with cooking spray.
  2. Meanwhile, in a large skillet over medium-high heat, cook bacon until crisp, set side., reserving 2 tablespoons bacon grease.
  3. Add onions, and cabbage to bacon grease and saute 8 to 10 minutes, or until lightly browned.
  4. Place 3 noodles on bottom of prepared baking dish. Spread 1/3 of cabbage mixture mixture over noodles, then top with 1/3 of garlic mashed potatoes. Repeat layers until a total of 4 layers of noodles and 3 layers of potato mixture have been placed (with a layer of noodles on top). Top with remaining sauteed cabbage,  onions. then top with cheese.
  5. Cover with aluminum foil and bake 35 to 45 minutes, or until heated through.