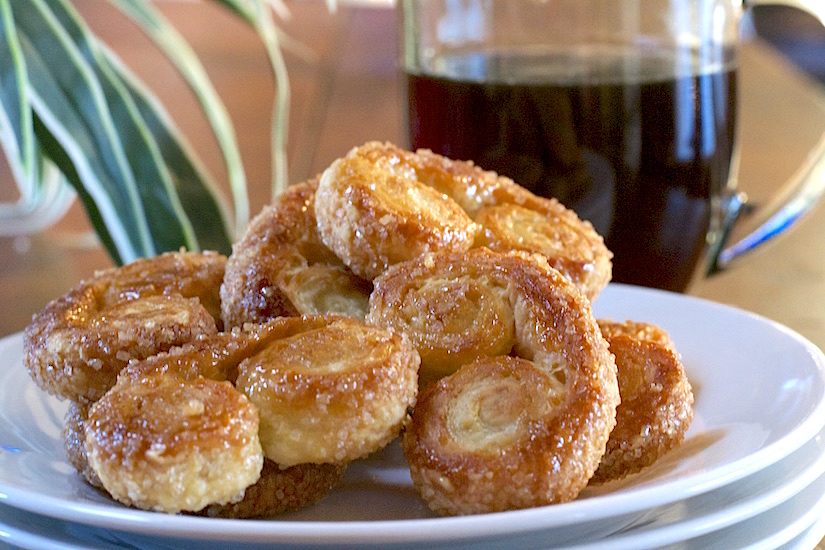
Mini Palmiers

Mini Palmiers

French translation …..Palm tree……..hmmmm……not quite sure about that, but what I am sure about is these are the best little treats for……..…well anytime and I say anytime because they are so damn easy to make!

Mini Palmiers

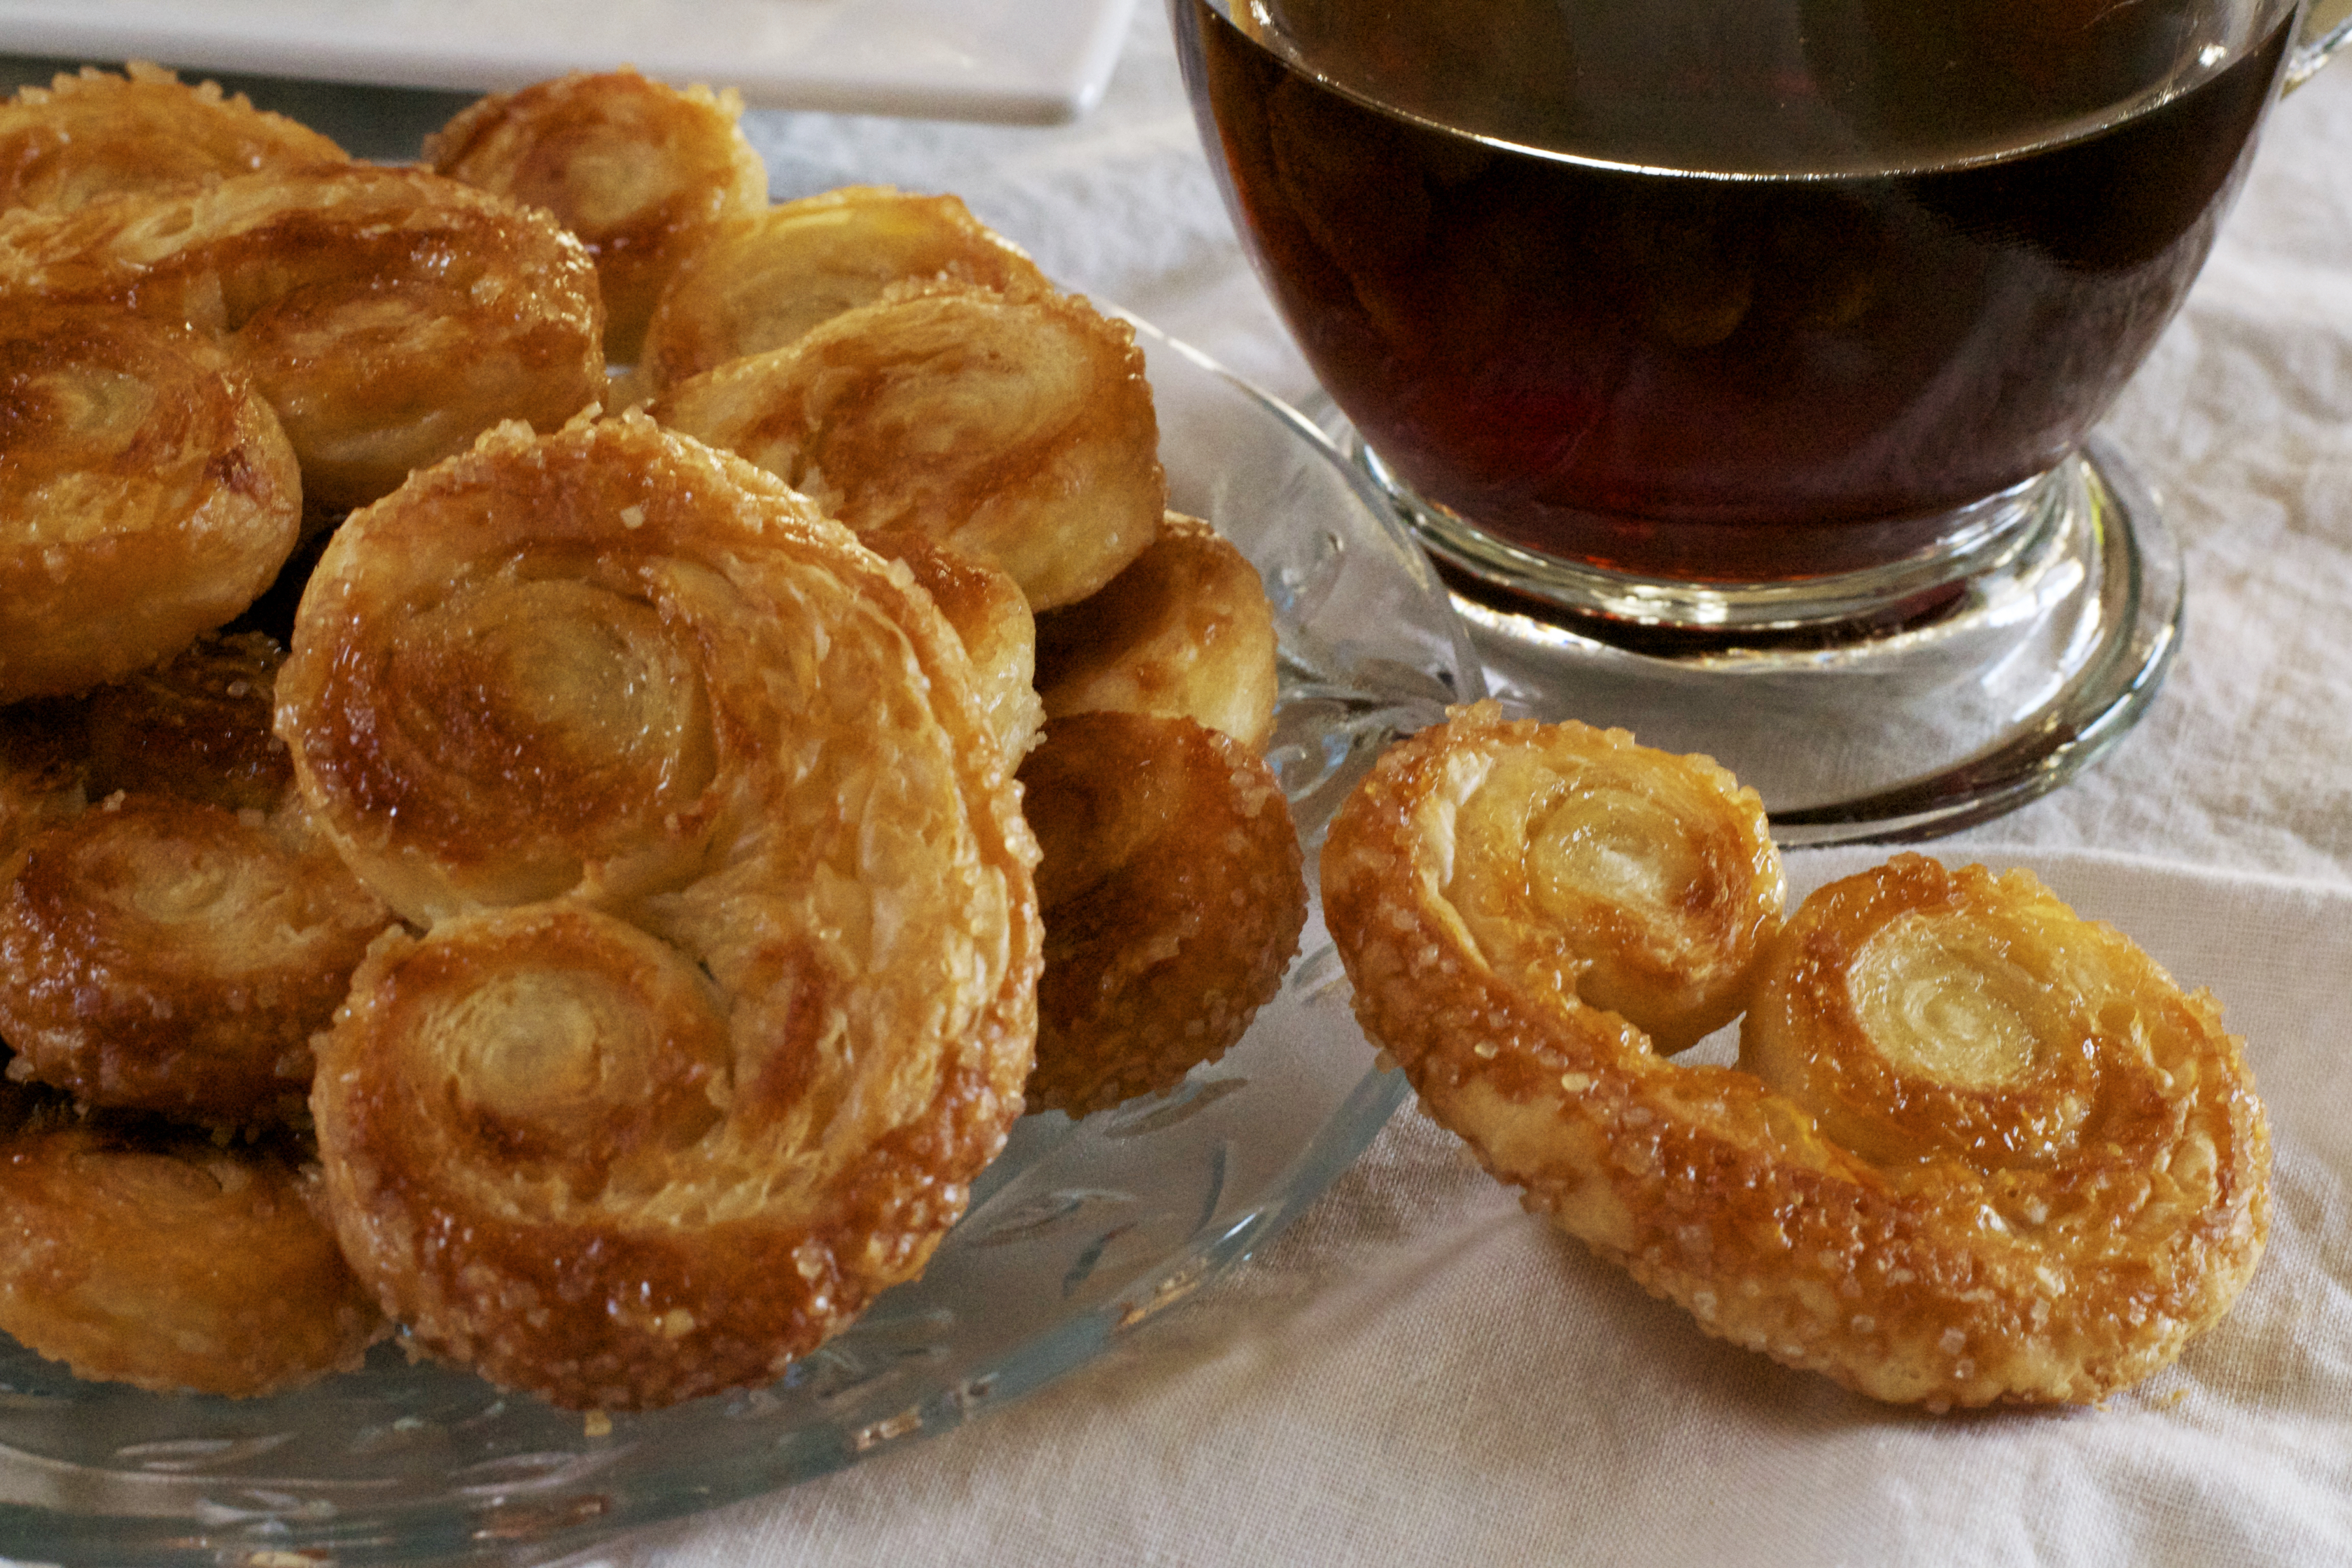
2 ingredients …….that right just two!!!!

Made from puff pastry…….dough and butter that has been rolled and folded, to make layer,upon layer, upon layer…….. X 100 of flakey yummy buttery dough.

Now, if want to be all fancy schmancy, go ahead and make the pastry yourself……..I’m sure you can google a recipe…….but, if want all the best of pastry with no fuss, Pepperidge Farm is the way to go. It’s ready all ready……… they do all the hard work and you get all the glory.

Turbinado sugar is the other ingredient. I have mention this in several of my dessert recipes. It has become my go to sugar for desserts. It gives a nice crunchy layer to anything sweet.

So, you all know, I’m about the lesson, bout the lesson , no guessing………gee whiz I have been singing way too much lately…………. so here’s the lesson…………turbinado sugar is made by taking the first pressing of juice from sugar cane,slowly heating it to evaporate the water out of it which causes it to crystallize.The crystals are then spun in turbines or centrifuges.

This process is a big contrast to white sugar which is often much more heavily processed, and is generally made white by using a decolorizing filter like bone char to remove its natural color. Likewise, much brown sugar is actually white sugar with molasses added back into it to color it.

Some believe that turbinado sugar is a healthier alternative to other sweeteners because it undergoes less processing, and so retains more of the nutrients found in sugar cane juice. This method of production makes it suitable for vegans, since no animal byproducts are used. A teaspoon contains about a fair amount of calcium and potassium in addition to a negligible amount of iron. A cup of this sweetener also contains magnesium, phosphorus, and sodium.
So, while some argue about using sugar perhaps this is a case to use in moderation………like I know anything about moderation…….ha ha!

Mini Palmier

Now, I know Walmart is a long way from being French, but the first time I had a Palmier was from the deli/bakery at Walmart. It was awesome, flaky, sugary, and a little sticky and the things that make pastry delicious. I would stop and get them frequently on Fat Friday’s ……..that’s Tim and my days of the week to eat whatever……no holding back………not unlike some other days but still it, has been dubbed as such by the self proclaimed queen of making shit up………Me!!!!!

Which bring me to this recipe.I have visions of them being a nice addition to a Christmas cookie tray, as a potluck take along, or for that I need a dessert quick thing your husband or child just told you about……….you know that last minute panic deal!

But what I really like is ………..my own Palmiers anytime I want……but mini…….so they are really cute and absolutely perfect with a cup of coffee or tea.

Mini Palmiers Collage

So, walk don’t run and get the pastry and turbinado sugar to try these easy two ingredient Palmiers.

Print
clock clock iconcutlery cutlery iconflag flag iconfolder folder iconinstagram instagram iconpinterest pinterest iconfacebook facebook iconprint print iconsquares squares iconheart heart iconheart solid heart solid icon
Mini Palmiers

Mini Palmiers

  • Author: Marty Boyd
  • Prep Time: 15 minutes
  • Cook Time: 20 minutes
  • Total Time: 35 minutes
  • Yield: 32 1x
  • Category: Dessert
  • Method: Bake
  • Cuisine: American

Ingredients

Scale
  • 1/23/4 cup turbinado sugar
  • 1 package Pepperidge Farm puff-pastry sheets,thawed

Instructions

  1. Heat oven to 400*
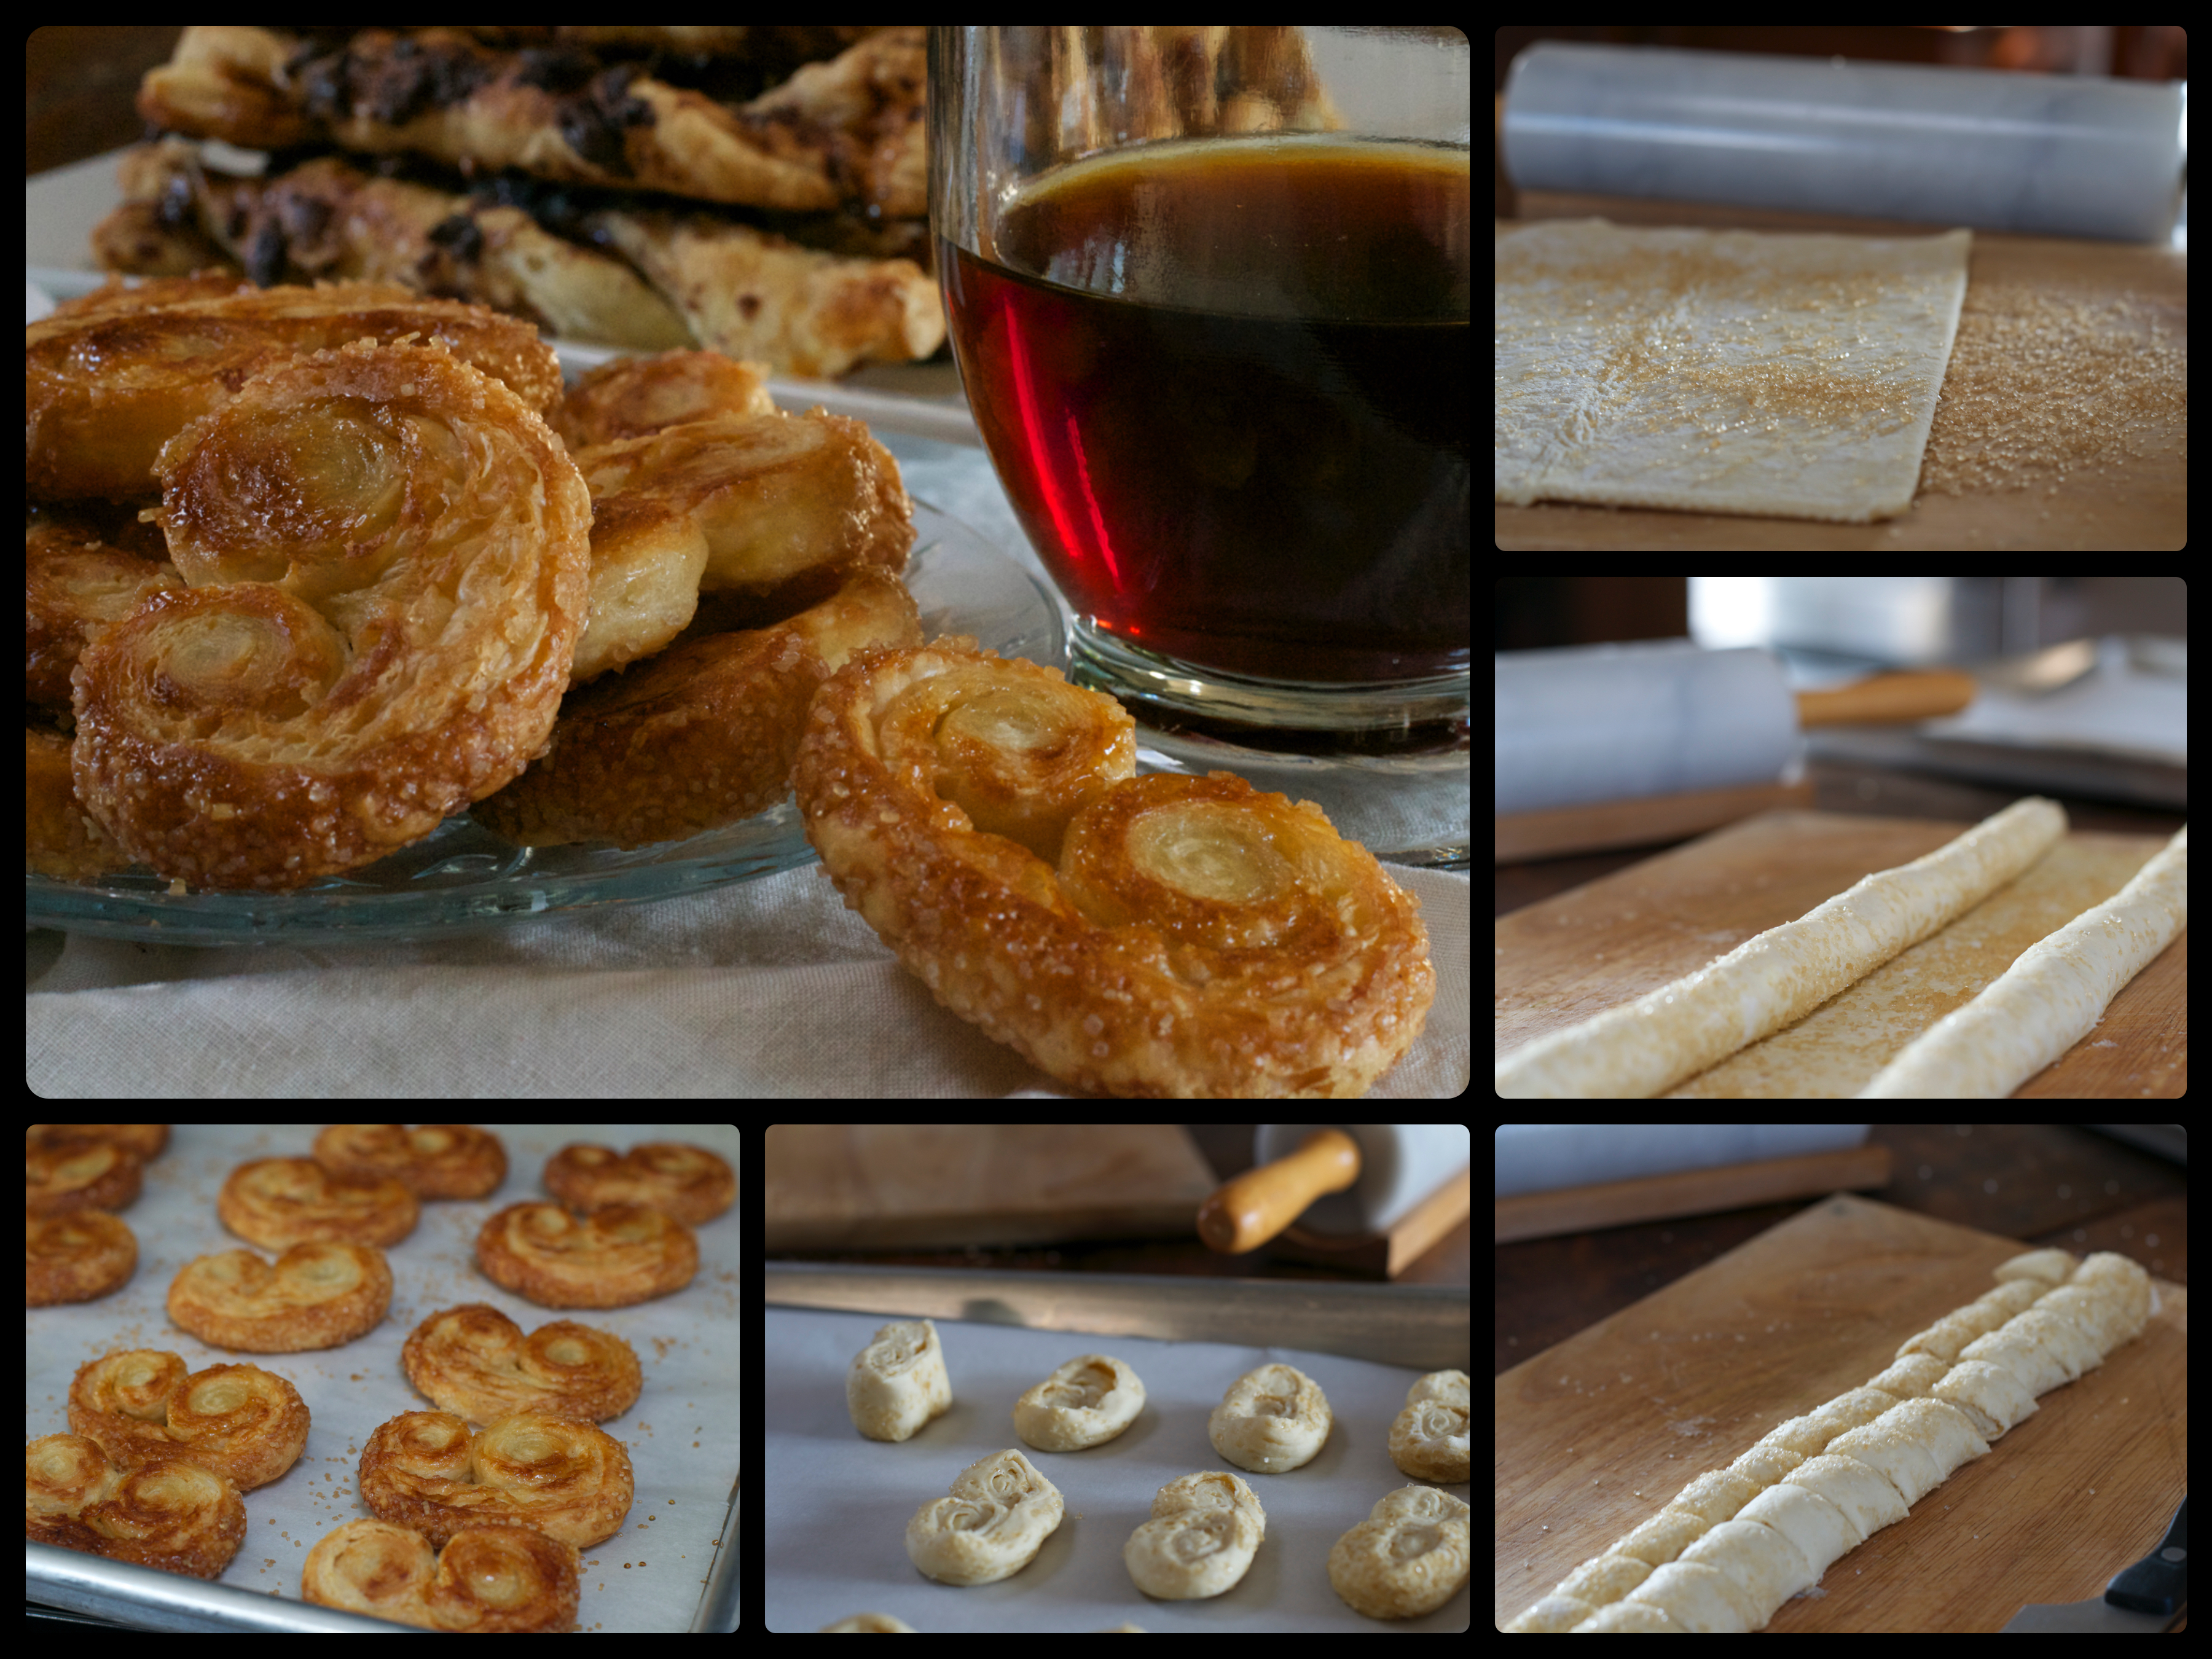
  2. Sprinkle 2 tablespoon of sugar on your work surface. Unfold pastry working with one sheet at a time, keeping the other sheet cover to prevent it from drying out.
  3. Place unfold sheet on the sugar. Roll it to an even thickness. Sprinkle it with 2-3 tablespoons of the sugar, pressing into the dough slightly.
  4. Starting at one long side of the rectangle, roll the pastry toward the center of the sheet, stopping at the middle. Repeat with the opposite long side, so the rolls meet. Trim the ends.
  5. Cut the roll into equal pieces. I find that dividing the roll in half, then the halves in half and half again is the easier way to have all even slices.Place slices on a baking sheet lined with parchment paper, spacing them 1 inch apart. I flattened my slightly before sprinkling with more of the sugar.
  6. Bake until golden and puffed, 20 to 23 minutes. Remove from oven and flip palmers over. They should have a nice caramelized bottom. Let cool for 5 minutes. Transfer to a wire rack. Repeat with the remaining ingredients. They can be served warm or at room temperature.

Keywords: puff pastry, make ahead, easy, 2 ingredient, cookie


Roasted Pear Salad

Roasted Pear Salad

Roasted Pear Salad

Looking for a special side dish for the upcoming holidays?……… Roasted Pear Salad is it!

I am a recent convert to fruit on a green salad ………..well recent as in the last 10 years……ok so not so recent, but it is a taste to behold.

In my experience, salad was always lettuce,tomato,cucumber…….blah,blah,blah. So, the first time I tried fruit I was surprised how good it was, so I tried it again, and again and it kept getting better and better.

If you read my blog, you know if something catches my eye at the store it will make its way here…….lucky you!

I saw these pears and a fall salad came right to my mind. The pears on a bed of baby greens with walnuts and blue cheese……..sounded yummy. Some kind of vinaigrette to dress the salad……I had a plan.

Now, the biggest problem I have with apples or pears on a salad is that they turn color so easily unless you serve it right away and I am the make ahead type of gal!

I have tried lemon juice and the trick of soaking in 7-up, but never with much luck. I know you all can’t see it, but sometime a light bulb goes off in my head……..no really it does……..

If I roasted the pears the only color they would turn is a pretty, fall golden color, and what’s better than butter to make that happen?…….Paula Deen has the whole butter thing right, everything is better with butter.

Roasted Pear Salad

So, cut side down in butter and 20 minutes later add a touch of balsamic…….it was going in the dressing, so why not add the flavor to the pears?…….light bulb!
When they came out of the oven I wanted them to soak up all that balsamic butter flavor so, even though it was all I could do not too……..I left them cut side down until they were completely cool. When I turned them over…………I swear they were the most beautiful things, all glossy and golden. I knew I made the right choice.
Another plus to preparing the pears this way besides them not turning colors, you can make them ahead,along with all the other things for the salad, and put it together at a moments notice.
Perfect if you are going to a holiday happening and you are ask to bring the salad……totally portable.


Blue cheese and walnuts “pear” beautifully with pears. I like gorgonzola better than regular blue cheese. To me it has a smoother creamy flavor, but by all means use what ever blue type cheese you like best. Toasting the walnuts…….or any nut for that matter, enhances their taste, like a million, billion times………if you have never tried it, you really have too!

I used individual plates, but if you were taking this to a get-together you can use a platter and just slice the pears. But, I wanted a fancy smancy plate, so heres how it went…….Baby greens, roasted pear half ( cut side up to show all it beauty), sprinkle with gorgonzola and walnut……serve with Honey Balsamic Dressing.

Both Tim and I thought the presentation was elegant and beautiful…….then we ate the salad…….the seas parted and angels sang……..ok not really, but it was a little piece of heaven.

So, impress your friends, family or significant other with this beautiful looking and tasty fall salad Roasted Pear Salad……..it will “leaf” them breathless !

Roasted Pear Salad Collage

Print
clock clock iconcutlery cutlery iconflag flag iconfolder folder iconinstagram instagram iconpinterest pinterest iconfacebook facebook iconprint print iconsquares squares iconheart heart iconheart solid heart solid icon
Roasted Pear Salad

Roasted Pear Salad

  • Author: Marty Boyd
  • Prep Time: 10 minutes
  • Cook Time: 25 minutes
  • Total Time: 35 minutes
  • Yield: 4 1x
  • Category: Salad
  • Method: Bake
  • Cuisine: American

Ingredients

Scale
  • 8 cups mixed baby greens
  • 1/2 cup crumbled Gorgonzola cheese
  • 1/2 cup toasted walnuts, chopped
  • 2 Bosc pears,cut in half lengthwise
  • 2 tablespoons unsalted butter
  • 3 tablespoons balsamic vinegar
  • Honey Balsamic Dressing

Instructions

  1. Preheat oven to 400*
  2. Place 2 tablespoons butter in a 8×8 inch baking dish. Place in oven to melt butter. Remove core from pears halves using a melon baller or a small spoon.
  3. Place pears cut side down in the melted butter and bake uncovered for 20 minutes. Remove from oven and drizzle with the balsamic vinegar,return to oven for another 5 minutes. Remove from oven and let set until room temperature. Do not remove the pears from the baking dish until completely cooled.
  4. Divide the mixed green among 4 plates. Top greens with one pear half,skin side up. Sprinkle with Gorgonzola cheese and walnuts.
  5. Serve with Honey Balsamic Dressing

Keywords: baby greens, pears, gorgonzola cheese, slaw, side dish, walnuts

Print
clock clock iconcutlery cutlery iconflag flag iconfolder folder iconinstagram instagram iconpinterest pinterest iconfacebook facebook iconprint print iconsquares squares iconheart heart iconheart solid heart solid icon
Roasted Pear Salad

Honey Balsamic Dressing

  • Author: Marty Boyd
  • Prep Time: 5 minutes
  • Total Time: 5 minutes1
  • Yield: 1/2 cup 1x
  • Category: Salad
  • Method: Blend
  • Cuisine: American

Ingredients

Scale
  • 5 tablespoons olive oil
  • 2 tablespoons balsamic vinegar
  • 2 teaspoons honey
  • 1 teaspoon minced shallot
  • Salt and pepper to taste

Instructions

  1. In a small bowl mix vinegar,honey,and shallot until well blended. Whisk in oil until emulsified. Salt and pepper to taste.

Keywords: olive oil, balsamic vinegar, honey, shallot, dressing


Caramel Pecan Stuffed French Toast

Caramel Pecan Stuffed French Toast

Whenever I have people over, my first inkling is to feed them………especially when they are helping me with something.

Tim’s brother Mark and our sister in love Carrie (Mark calls Carrie’s mother, his mother in love ,because they are not married and I thought is was soooo cute and that makes Carrie our sister in love) came over Sunday morning to help us clean out our gutters.

They were coming over early, so I decided to make breakfast. Last Sunday I made the Greek Yogurt Raspberry Pancakes with Homemade Vanilla Syrup for Tim. This Sunday it was my turn……..French Toast………… jazzed up French Toast. Jazzy Stuffed French Toast!

I always get my best ideas at the grocery store! Cream cheese seemed like a natural in the French Toast stuffing department. Low and behold leave it to the people at Kraft to have a cream cheese that was honey pecan flavored……it was like fate….yummy fate! I needed more flavor…….hmmmm…….how about Dulce de Leche caramel……..extra yummy!

The one down fall of my local grocery store, is that the types of breads they carry in their bakery is not alway what I am looking for…..I was thinking a Brioche or Challah bread, but it was not to be.They do carry what they call a sweet French bread……it would work.

So, back in the kitchen…….I mixed the cream cheese and caramel together…easy enough. Cut the French bread into 2 inch thick slices and cut across the top to form a pocket. Smeared……technical cooking term………the inside of the pockets with the cream cheese mixture.

I made a brown sugar butter bed for the slices to set on…….I melted brown sugar and butter, and pored it on the bottom of the pan. I stood the stuffed slices upright, so the filling stayed put while baking.

The egg mixture that you normally dip the slices in became kinda like a bath for the slices. I poured it over making sure I had the mixture everywhere …….I used a knife to hold the slices apart so I could pour the mixture in between. Everything needed to be soaked with the egg mixture.

Caramel Pecan French Toast

At this point, I would have put the mixture in the frig overnight and baked it in the morning……which makes this a great make ahead dish…….but, as usual, I fell into the black hole of time……ok, just didn’t make the dish until the morning…..I had my lazy pants on!

It still worked out fine. I sprinkled the top with more pecans and some extra sugar,as if it didn’t have enough already. Into the oven for about 30 minutes and breakfast is served. I used the same Homemade Vanilla Syrup we used with the pancakes……all I can say is this was the best French toast I have ever,ever had…….in my whole life…..and that’s a long time!

Just a little tip…….always ask guests if there is something they do not like…….Carrie is not a pecan fan, so I don’t think she enjoyed it as much as Tim,Mark and I did……..but they were our taste testers for this one. Carrie was able to pick the pecans off, I still feel bad that I didn’t ask first.

This would make a great Christmas morning breakfast, or make it for a brunch……want ever the event …..make it! It’s super awesome!!!!!

Caramel Pecan French Toast Collage

Print
clock clock iconcutlery cutlery iconflag flag iconfolder folder iconinstagram instagram iconpinterest pinterest iconfacebook facebook iconprint print iconsquares squares iconheart heart iconheart solid heart solid icon
Caramel Pecan Stuffed French Toast

Caramel Pecan Stuffed French Toast

  • Prep Time: 15 minutes plus 12 hours refrigerate
  • Cook Time: 35 minutes
  • Total Time: 12 hours 50 minutes
  • Yield: 8 servings 1x
  • Category: Breakfast
  • Method: Bake
  • Cuisine: American

Ingredients

Scale
  • 2 loaves sweet french bread, cut into 82 inch thick slices
  • CARAMEL BASE:
  • 4 tablespoons brown sugar
  • 4 tablespoons butter, melted
  • STUFFING:
  • 18 oz. tub of Honey Pecan Philadelphia Cream Cheese
  • 1/2 cup Dulce de Leche
  • EGG MIXTURE:
  • 1 cup half and half
  • 6 whole eggs
  • 1 tablespoon vanilla extract
  • 1/2 teaspoon salt
  • 1 teaspoon cinnamon
  • TOPPING:
  • 1/2 cup pecans, chopped
  • 2 tablespoons Turbinado sugar

Instructions

  1. In a small bowl, combine brown sugar and butter. Microwave until butter is melted. Stir until well blended. Pour into the bottom of a 9×13 inch baking dish.
  2. In another small bowl mix together the cream cheese and dulce de leche.
  3. Using a paring knife, cut about 1 inch into the tops of each slice of bread to create a pocket.
  4. Stuff the insides of the pockets with 1 1/2 tablespoons or more of the cream cheese caramel mixture.
  5. Arrange the stuffed slices of bread in the baking dish, so that the tops of the bread are facing up so the filling does not melt out.
  6. Combine half and half, eggs, vanilla, salt and cinnamon in a bowl and pour evenly over bread slices. Sprinkle 1/2 cup chopped pecans and sugar over bread slices.
  7. Wrap tightly with plastic wrap. Refrigerate for 4 to 12 hours.Take the casserole out of the fridge for at least 10 minutes. Preheat oven to 350ºF. Make sure all bread slices are evenly coated in egg mixture.
  8. Bake for 30-35 minutes.
  9. Remove French toast from oven and let it cool slightly before serving. Serve Homemade Vanilla Syrup.

Notes

I only let mine set for about an hour the first time I made it and it turned out fine.

Keywords: breakfast, brunch, caramel, pecans, french toast