Cumin Beef Kabobs

Cumin Beef Kabobs

Cumin Beef Kabobs

It’s time to grill!!!!

Once Memorial day has passed, it is summer time………..pools open, flowers and gardens are blooming, and you can wear white pants.

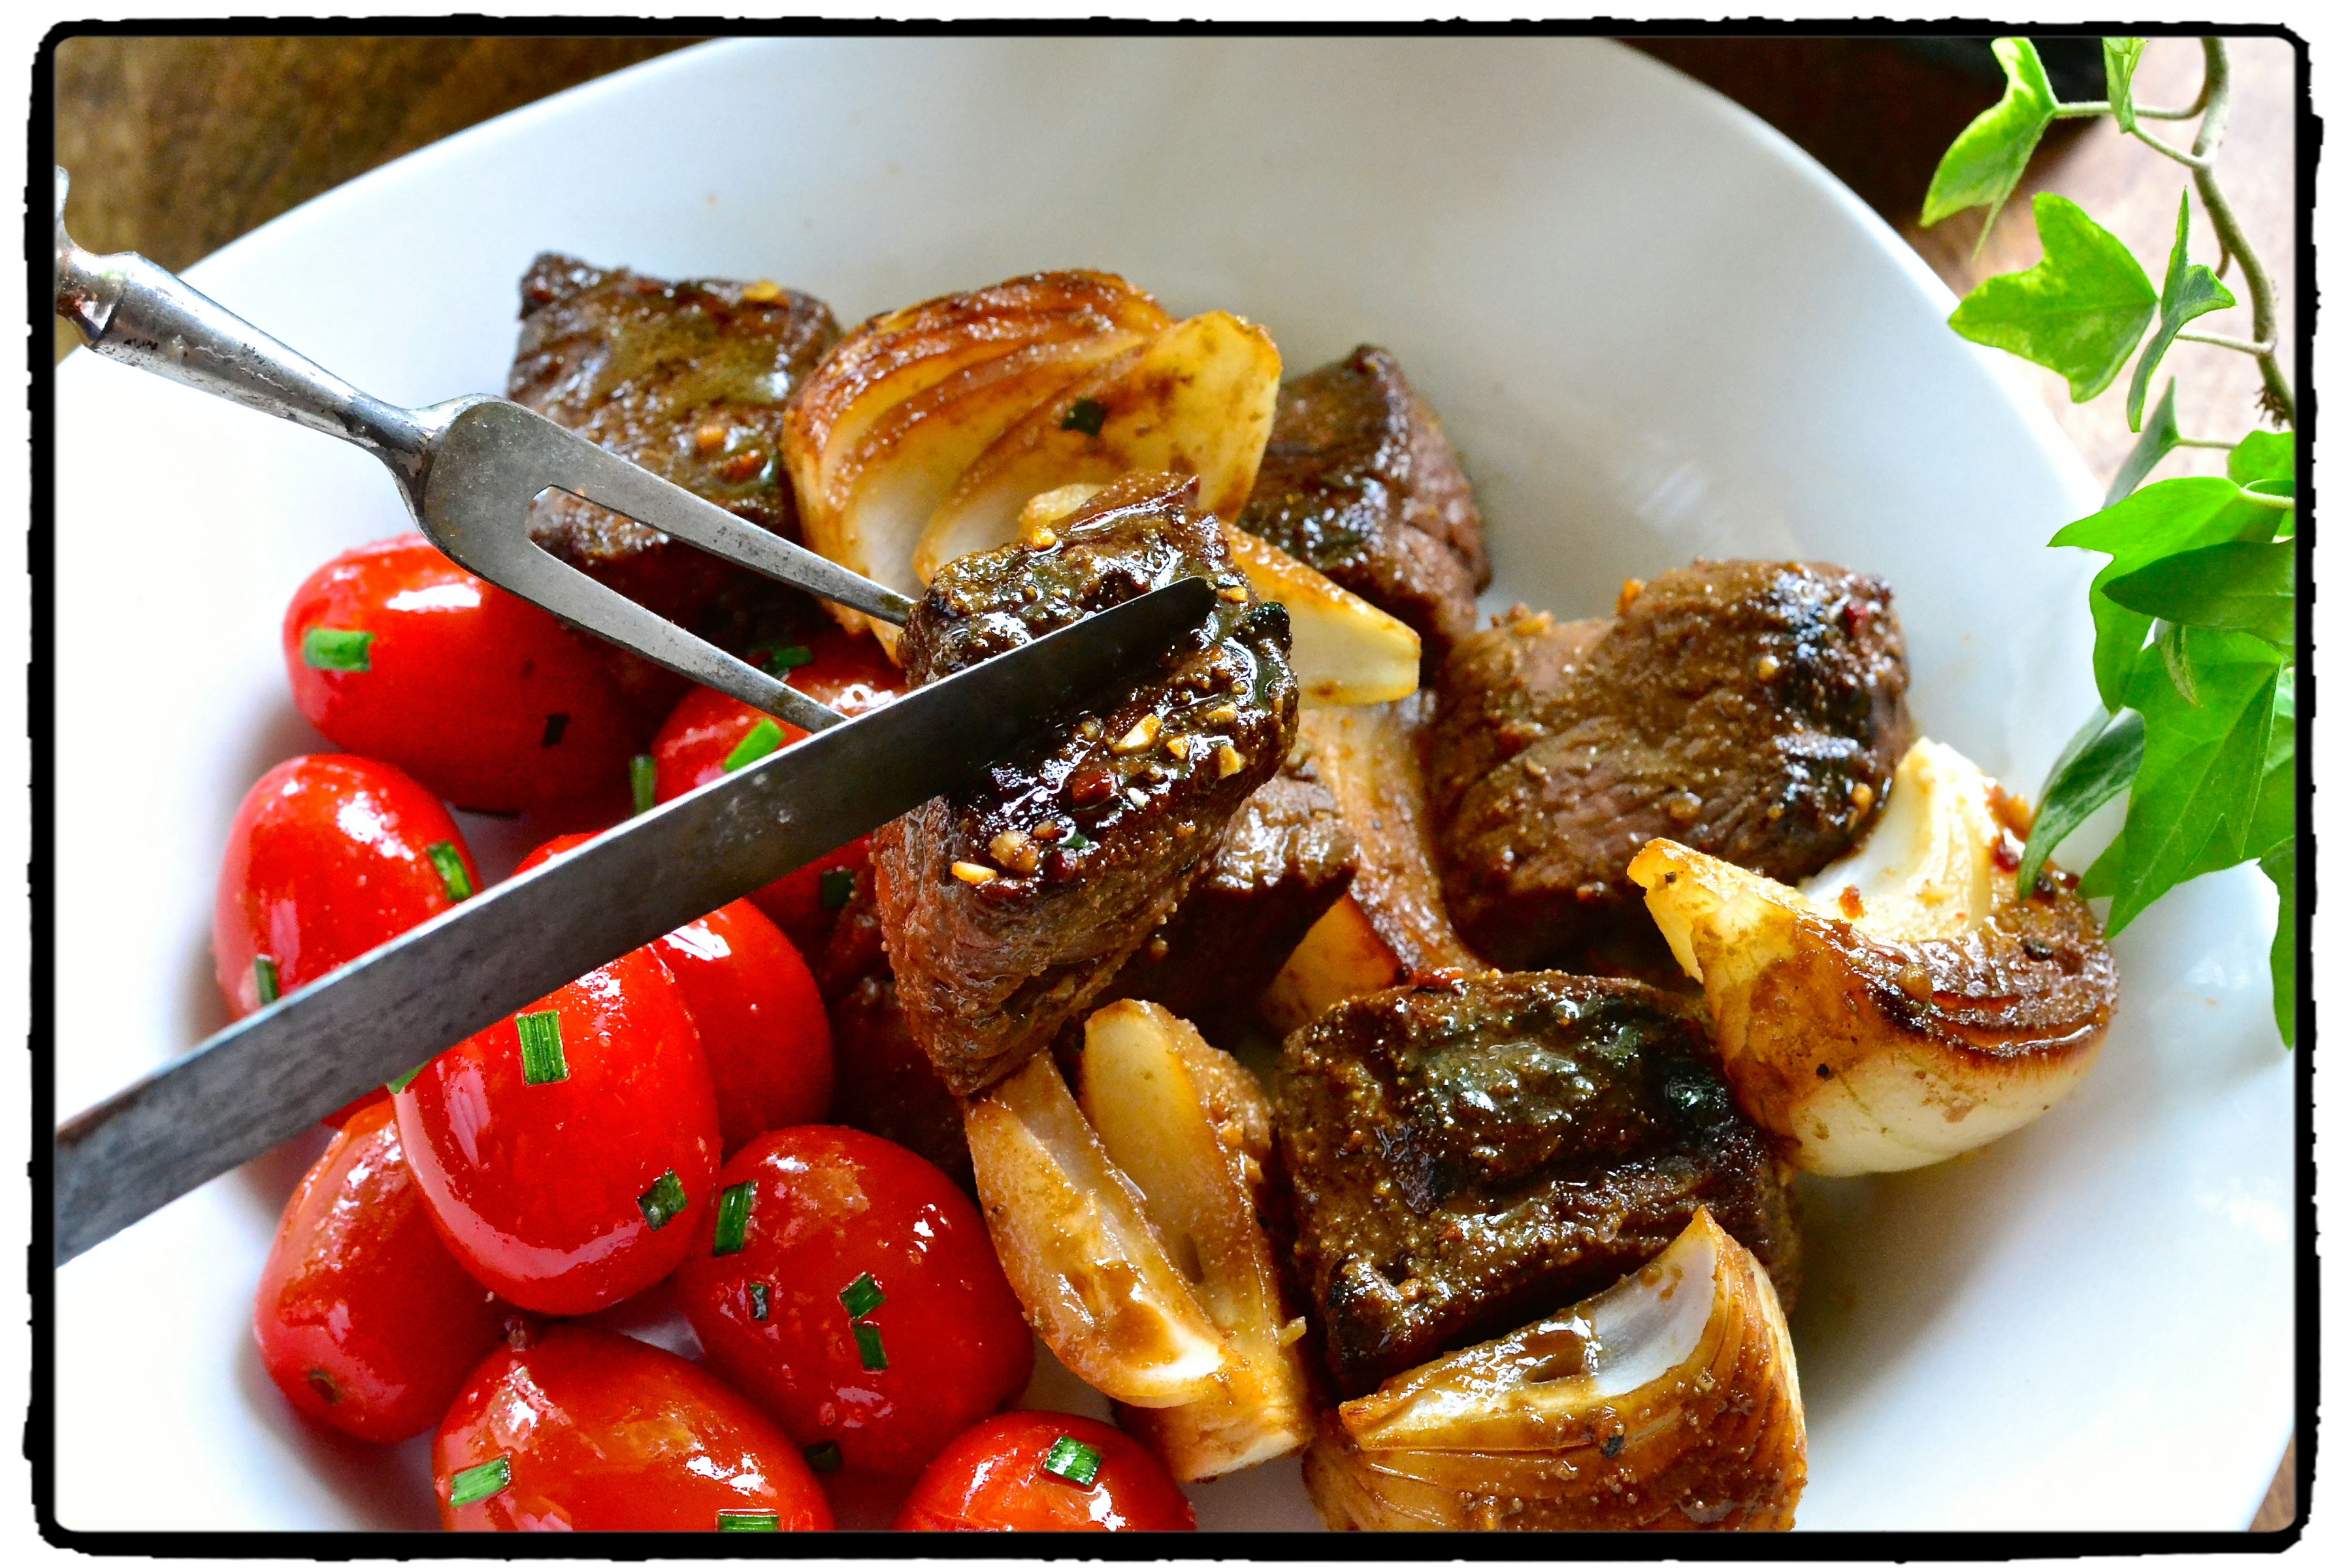
Although we do not eat a lot of beef, occasionally Tim and I like a nice steak, or in this case some Cumin Beef Kabobs.

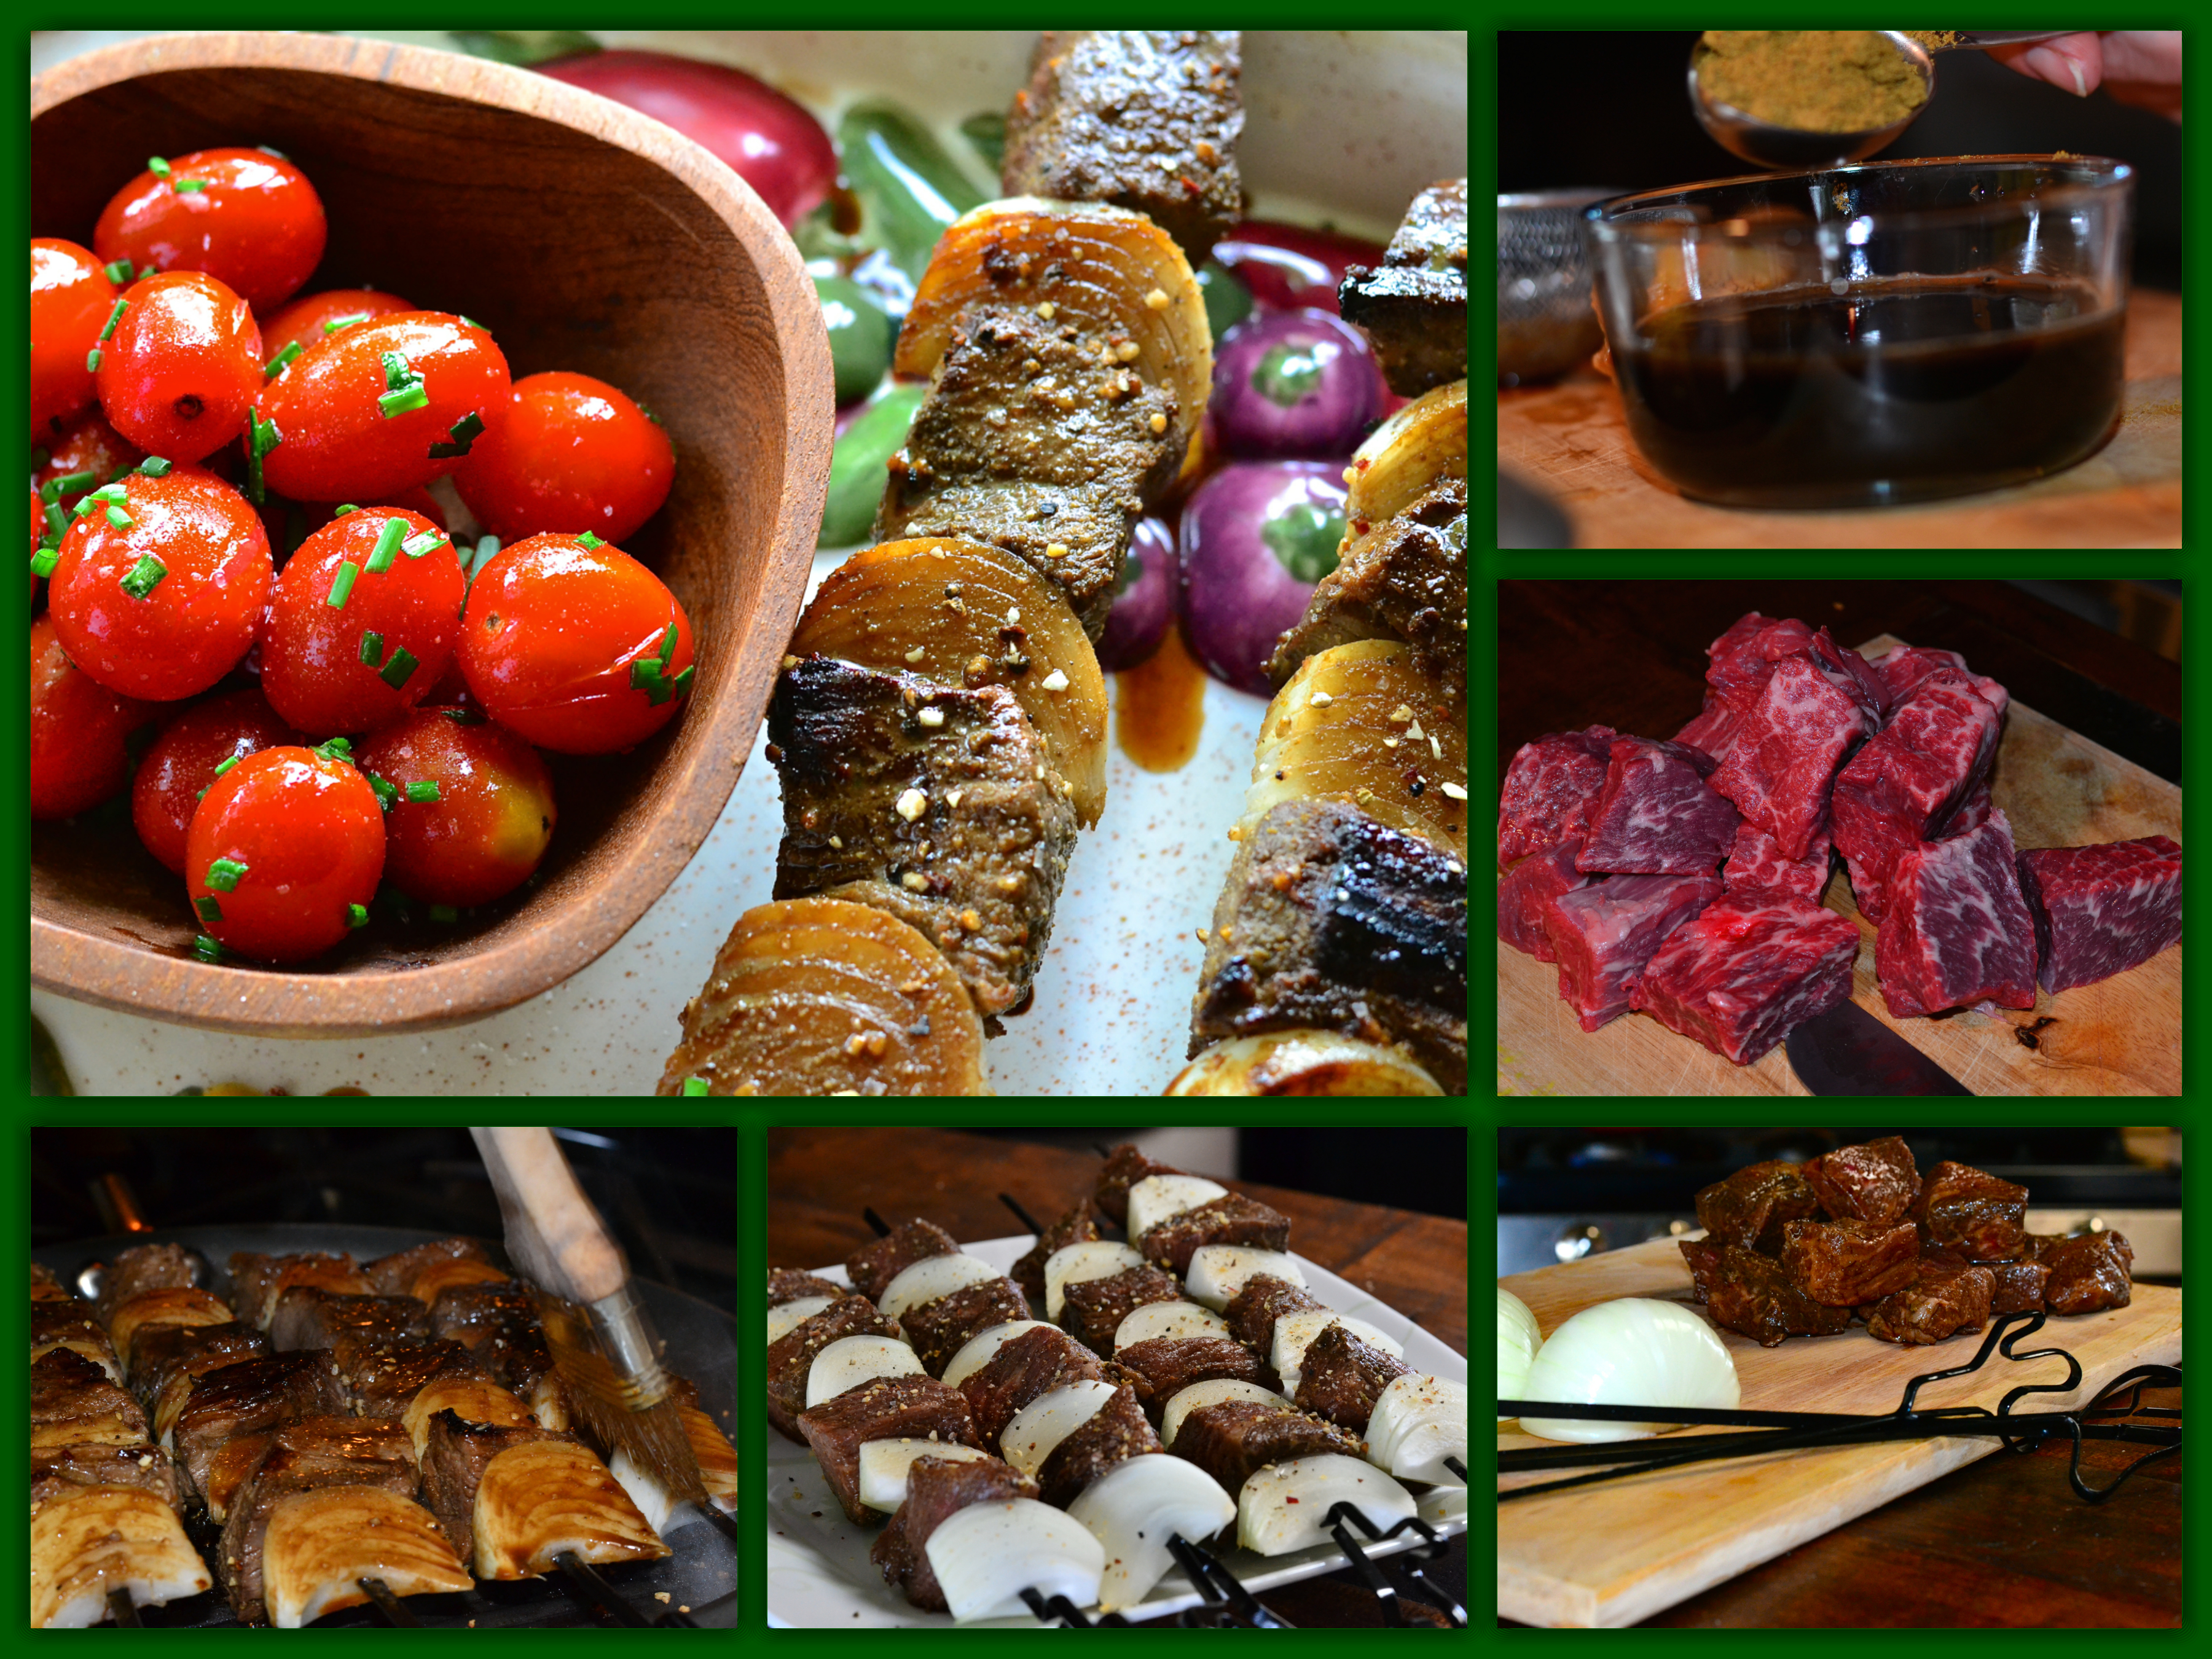
Ease of preparation in the summer is key to enjoying said summer…………Marinading makes any cut of beef extra tasty, and there is something about marinading in soy that makes beef taste extra delicious. Add Tim’s favorite spice……next to red pepper flakes…….cumin, and the marinade is easy and makes the beef tender and juicy, even if you use an less expensive cut of meat.

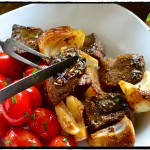
When making kabobs I have one piece of advice, make sure everything on the kabob has approxamately the same cooking time. If you try veggies that have a short cooking time, they will either burn or in they will fall completely off the skewer by the time your meat is done. Although they do make kabob baskets that holds everything inside,I have not been able to find them this year 🙁 ……….But they are a nifty device, if you can find them. I must admit I really haven’t looked that hard. Besides I found this really cute kabob set at the local Goodwill store that I had been dying to try…………..I love the way it looks.

Cumin Beef Kabobs 1

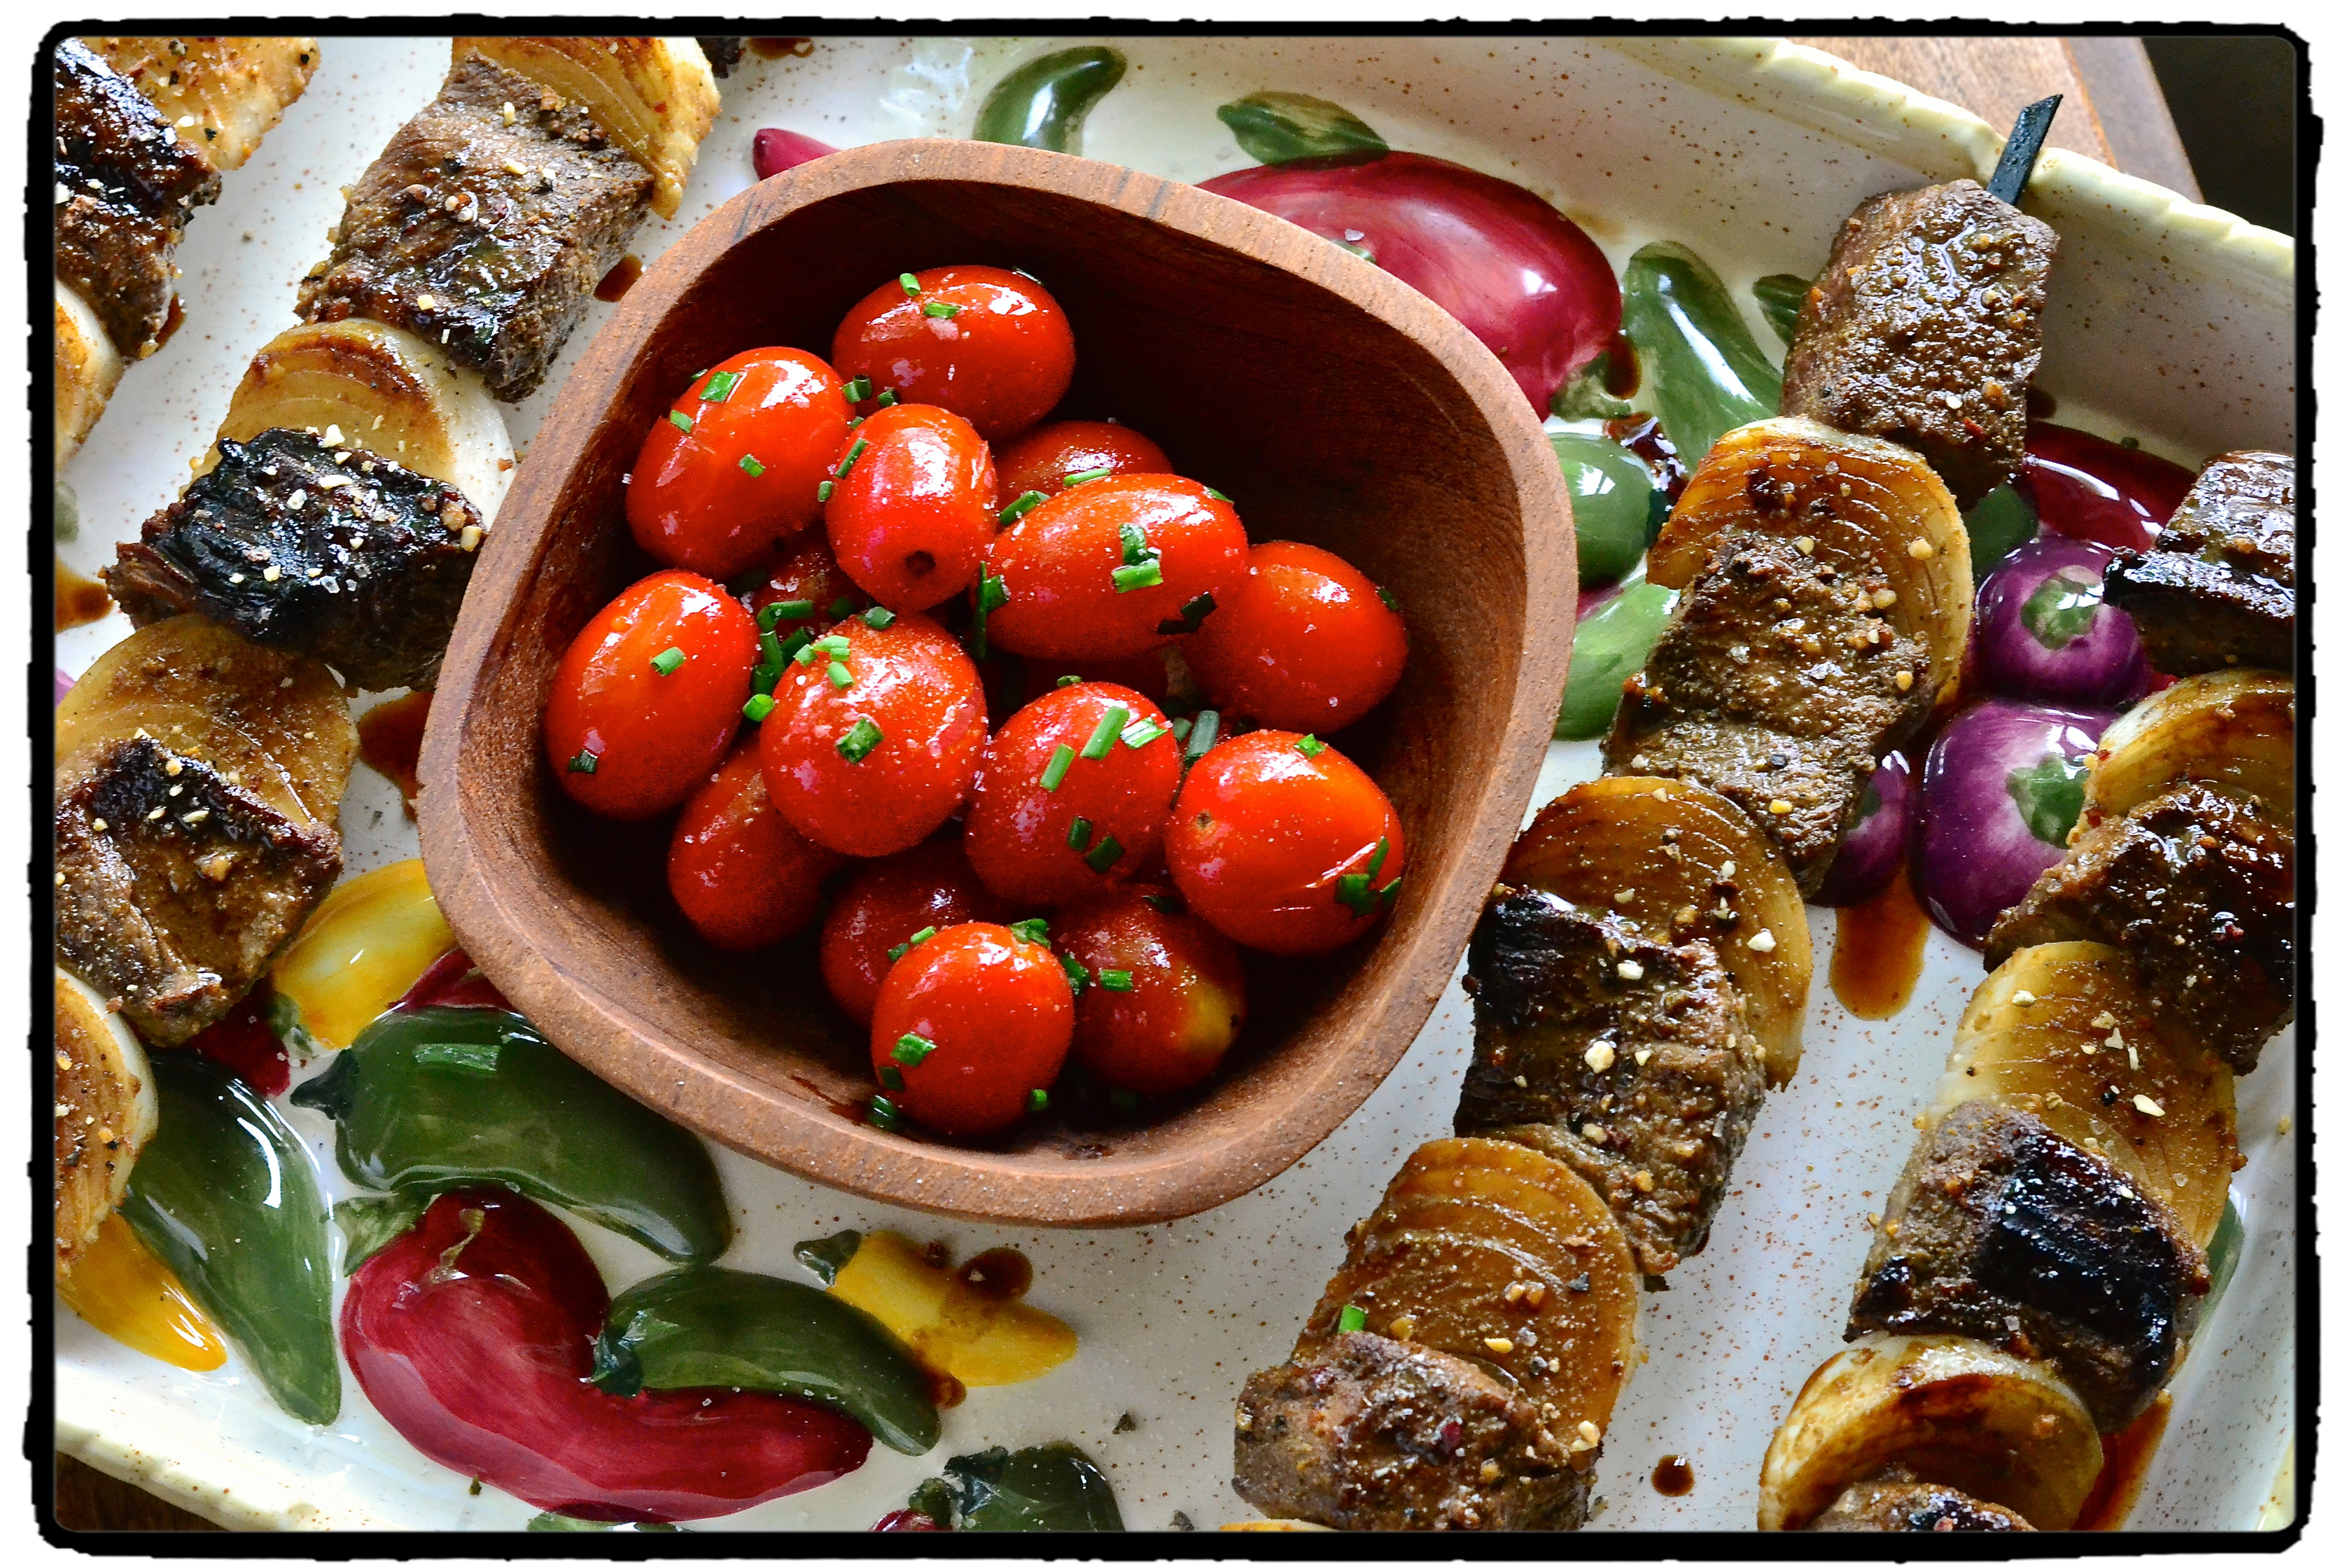
For these kabobs I wanted to use tomatoes, but as I said above they would have just fallen off the skewer by the time the meat and onions were ready. So I just sautéd them on the side with a bit of sea salt and finished them with a snip of chives. Which by the way, my chives are beautiful this year……….more on the garden as it grows.

So, when you are looking for a easy but delicious kabob recipe, try these Cumin Beef Kabobs with a side of sautéd cherry tomatoes and enjoy some summer grilling!

Cumin Beef Kabobs Collage

Print
clock clock iconcutlery cutlery iconflag flag iconfolder folder iconinstagram instagram iconpinterest pinterest iconfacebook facebook iconprint print iconsquares squares iconheart heart iconheart solid heart solid icon
Cumin Beef Kabobs

Cumin Beef Kabobs

  • Author: Marty Boyd
  • Prep Time: 15 minutes
  • Cook Time: 6-10 minutes
  • Total Time: 25 minutes
  • Yield: 4 1x
  • Category: Main Dish
  • Method: Grlll
  • Cuisine: American

Ingredients

Scale
  • 1 pound beef,cut into 1-inch pieces ( I used an Angus Western Style Rib – which is boneless, but use what ever is your taste in beef)
  • 1/4 cup soy sauce
  • Juice of one fresh lemon
  • 1 tablespoon ground cumin
  • 2 small onions, cut into 8 wedges
  • Kabobs skewers

Instructions

  1. Combine soy sauce, lemon juice, and cumin in a small bowl. Place meat and marinade in a ziploc bag and marinade overnight.
  2. Prepare barbecue (high heat) or preheat grill pan. Thread beef onto skewers, alternating meat and onions. Grill until beef is tender, turning occasionally, about 6 minutes for medium rare.
  3. Serve with sautéd cherry tomatoes.

Notes

Prep and cook time do not include marinading overnight.

Keywords: beef, onion, tomatoes, cumin, soy sauce, grill, easy


Gluten Free Strawberry Shortcake

Gluten Free Strawberry ShortcakeGluten Free Strawberry Shortcake

Now that we are getting some folks following our adventure, we are starting to receive requests for recipes. Tim and I were grocery shopping, and a gal we know stopped us in the parking lot. After exchanging pleasantries, she ask us about Gluten Free recipes. She has a gluten intolerance, so we said we would see what we could do. I have never made anything gluten free in my life………yikes! What did I say we would do????

I decide that dessert would be the best place to start, and strawberries are just making their spring appearance in the grocery store. So Strawberry Shortcake seemed like a good choice.

I know several people who have gluten intolerances and although products have come a long way, I know they have struggled finding replacement for some of their favorite foods. So, in an effort to try and make some thing gluten free and still tasty, and to live up to my word, I searched……… I came across several sites that had a variety of ways to make gluten free products, but to be honest some of them sounded like science experiments.

I was really looking for something easy that would not require a beaker and bunsen burner. As I was looking at all the gluten free items at the grocery store, my eye caught Almond Flour, now we like almonds, so I figured it should be a good replacement for flour. The rest was just basic baking items, butter, eggs, vanilla, and baking soda. I was a little worried after I mixed the dough, as it was really sticky and still wet, but I remembered reading in one recipe I saw that they chilled the dough, so in the frig it went. After about 10-15 minutes it was a nice dough. I scooped mine with an ice cream scoop but I think you could roll them out if you wanted too. I topped mine with Turbinado sugar for an extra little crunch and shine (old trick from my bakery days). I let them cool and could not help myself and tasted one……….I was sooooo surprised, they were really tasty. More dense than a traditional shortcake biscuit, but if I could not tolerate gluten these would be a perfect substitution.

Now about those strawberries, I know what you’re thinking………Balsamic Vinegar has she gone mad!!!! I truthfully thought that the first time I saw a recipe using vinegar with strawberries, but do your self a favor…….TRY IT………I make strawberries this way all the time and it is awesome. The brown sugar and the balsamic makes almost like a syrup for those beautiful red berries. The berries and the syrup they make soaks into that shortcake beautifully and topped with a dollop of whipped cream………..a little piece of heaven…..I don’t think anyone would be able to tell it was gluten free.

So, if you or your family, or a friend has an intolerance to gluten, try this recipe as a replacement for that traditional Strawberry Shortcake that is a summer dessert favorite.

Gluten Free Strawberry Shortcake Collage

Print
clock clock iconcutlery cutlery iconflag flag iconfolder folder iconinstagram instagram iconpinterest pinterest iconfacebook facebook iconprint print iconsquares squares iconheart heart iconheart solid heart solid icon

Gluten Free Strawberry Shortcake

  • Author: Marty Boyd
  • Prep Time: 20 minutes
  • Cook Time: 15 minutes
  • Total Time: 35 minutes
  • Yield: 8 1x
  • Category: Dessert
  • Method: Bake
  • Cuisine: American

Ingredients

Scale
  • Shortcake Biscuits:
  • 2 1/2 cups blanched almond flour
  • 1/2 tsp baking soda
  • 1/4 tsp sea salt
  • 1/4 cup butter, melted
  • 1 tbsp honey
  • 1/4 tsp pure vanilla extract
  • 2 large eggs
  • 1 tablespoon Turbinado Sugar ( if you do not have Turbinado regular sugar
  • will work also )
  • Strawberry Topping:
  • 3 1/2 cups fresh, ripe organic strawberries, sliced
  • 1/4 cup brown sugar

Instructions

  1. Shortcakes:
  2. Preheat oven to 350 degrees.
  3. In a medium bowl, sift together the almond flour, baking soda and salt.
  4. In a small bowl, whisk together the melted butter and honey until smooth. Add the eggs and vanilla, whisking together until well combined.
  5. Stir the wet mixture into the dry mixture until thoroughly combined.
  6. Chill dough in the refrigerator 10-15 minutes.
  7. Using an ice cream scoop, scoop dough onto a baking sheet lined with parchment paper and gently flatten to about one-inch thick. I got 8 biscuit out of the dough.
  8. Bake approximately 15 minutes, until top is golden brown.
  9. Allow biscuits to cool completely before splitting and filling.
  10. Strawberries:
  11. In a large bowl, combine sliced strawberries, brown sugar and balsamic vinegar. Allow to set for an hour or two.
  12. Do not let set more than an hour or two as the berries will get mushy. They will still fast good but they will not look as pretty.
  13. To Assemble:
  14. Split biscuits in half and top with a couple of heaping spoonfuls of strawberry topping and a dollop of whipped cream

Keywords: strawberries, gluten free, shortcake, dessert


Grilled Chicken Veggie Salad

Grilled Chicken Veggie Salad

Grilled Chicken Veggie Salad

I think Spring may finally be here to stay……….yeah!!!! So what better to fix than a salad loaded with spring veggies and grilled chicken……..Grilled Chicken Veggie Salad.

I have had many requests for salads and healthy fare. I have made several small attempts at healthier recipes, but when the weather is crappy I’m more inclined to comfort foods.

With the arrival of Spring and all things anew, this Grilled Chicken Veggie Salad is just the ticket. Mixed green topped with grilled chicken, red and yellow peppers, cherry tomatoes, sweet snap peas and asparagus make for a crunchy, fresh salad.

For a dressing I went with an Asian flare………..Ginger Garlic Dressing. It’s tangy with rice wine vinegar, just a small amount of oil, ginger, garlic, soy and honey……..very yummy.

The best thing about this salad is you can make it in advance and assemble it when you are ready. All the components can keep for up to two days, isn’t that nice, you can make it when you have time and eat it when you don’t…………makes life so much easier to have a little something in reserve for the days you don’t have time to cook! Bonus………it’s HEALTHY!!!!

So, make up this salad today and enjoy it when you are done with all that Spring cleaning……….which reminds me, I best get busy!

Grilled Chicken Veggie Salad Collage

Print
clock clock iconcutlery cutlery iconflag flag iconfolder folder iconinstagram instagram iconpinterest pinterest iconfacebook facebook iconprint print iconsquares squares iconheart heart iconheart solid heart solid icon
Grilled Chicken Veggie Salad

Grilled Chicken Veggie Salad

  • Author: Marty Boyd
  • Prep Time: 10 minutes
  • Cook Time: 10 minutes
  • Total Time: 20 minutes
  • Yield: 4 1x
  • Category: Salad
  • Method: No Cook
  • Cuisine: American

Ingredients

Scale
  • 8 ounces chicken breast tenderloins, halved crosswise
  • Salt and ground black pepper to taste
  • 1 tablespoon olive oil or cooking oil
  • 8 ounces fresh asparagus, trimmed
  • 8 ounces fresh sugar snap peas, trimmed
  • 3 cups mixed salad greens
  • 1/2 each medium yellow and red pepper cut into thin strips
  • 1/2 cup grape tomatoes
  • 1 Recipe Ginger Garlic Dressing

Instructions

  1. Directions
  2. 1. Sprinkle chicken lightly with salt and pepper. In a large skillet cook chicken in hot oil over medium-high heat for 6 to 8 minutes or until no longer pink, turning to brown evenly. Remove chicken from skillet. Place chicken on a plate and cover, chill at least 1 hour. You may also leave in refrigerator for up to two days.
  3. 2. In microwave cook asparagus and pea pods, covered, in a microwave safe dish for 1 to 2minutes or until crisp-tender. Drain; place in an ice bath to cool. Drain well. Serve immediately or place in an airtight container in the refrigerator up to 2 days.
  4. 3. To serve, in a very large bowl toss together chilled chicken, asparagus, pea pods, watercress, sweet pepper, and tomatoes. Add Ginger Garlic Dressing; toss well.

Keywords: asparagus. grilled chicken, snap peas, mixed greens, sweet peppers, tomatoes, garlic ginger dressing, salad

Print
clock clock iconcutlery cutlery iconflag flag iconfolder folder iconinstagram instagram iconpinterest pinterest iconfacebook facebook iconprint print iconsquares squares iconheart heart iconheart solid heart solid icon
Grilled Chicken Veggie Salad

Garlic Ginger Dressing

  • Author: Marty Boyd
  • Yield: 4 1x

Ingredients

Scale
  • 1/4 cup rice vinegar
  • 3 tablespoons olive oil
  • 2 clove garlic, minced
  • 2 teaspoon honey
  • 1 teaspoon soy sauce
  • 1/2 teaspoon sesame seeds, toasted
  • 1 teaspoon freshly grated ginger root
  • 1/8 teaspoon salt
  • Dash ground black pepper

Instructions

  1. Measure all dressing into a small screw top jar. Cover and shake well. Serve immediately or store in refrigerator up to 1 week; shake before serving.